Wednesday, July 28, 2010

GrandStay Residential Suites Hotel in Apple Valley, MN - A Review


We made it back home after 8 days and 7 nights at the GrandStay Residential Suites Hotel in Apple Valley, MN and what a grand stay it was! Upon arrival at the hotel, the staff was friendly and helpful in getting us checked in. We loaded up our luggage, took the elevator up to the 3rd floor and found 313 - our home for the next week. When we opened the door we were pleasantly surprised at the amount of space a 2 bedroom queen suite afforded us. And this was after knowing the floor plan of the room ahead of time!


The one bedroom was quite large and had plenty of space for a play pen. Actually, it would have space for at least 2 playpens in addition to the queen bed that was already there, the flat panel TV and the chest of drawers. Admittedly, the TV was a bit small but we are no TV snobs and it was just fine for us. This became the girl's room. It was bright and sunny thanks to the 2 windows but was nice and dark at night given the room darkening curtains.


The other bedroom with queen bed was much smaller, had the same flat panel TV and chest of drawers, and was perfect for the two of us. After all, how much room do we really need? It also had a window and the same room darkening curtains.


The "great room", as they call it, had a sleeper sofa, a wingback chair, a larger TV and DVD player in an armoire, a closet, the full fridge with freezer (which has an ice maker), a dishwasher, a two-burner stove, a small table/desk with two chairs, dinnerware for 4 including large and small plates, mugs, tumblers and silverware, a can opener, a bottle opener, a glass measuring cup, a long handled plastic lifter and spoon, a medium-sized plastic bowl, a medium-sized pot and pan, hot pads, tea towel and dish cloth, soap for both washing dishes by hand and in the dishwasher, paper towels, a two-slice toaster and a coffee maker plus plenty of cupboard space to hold all the dishes plus any food you need to store.


The sleeper sofa was the boy's bed for the week. This room also had a window with room darkening curtains so the whole suite was bright and sunny. The bathroom was a little larger than other hotels I have visited and came with the typical tub/shower, toilet, and sink on a large vanity plus the promised Bath & Body Works products!


Usually I find hotel rooms hot and dry thanks to inadequate heating/cooling needs. This one was not like that at all. The suite came with its own furnace/AC system so controlling the temperature was easy, effective and very quiet. It sounded just like the system at home and we were able to sleep in cool comfort. The complimentary breakfast served from 6am-10am daily was large and afforded a nice selection. There were various cereals in self-serve bowls, bagels and bread, pastries and donuts, muffins, batter to make waffles on the two waffle makers, hardboiled eggs ready to eat (no peeling shells), yogourt, fresh fruit, and biscuits with egg and sausage. Apple juice, orange juice, milk, coffee and tea were the beverages available. A couple of highchairs and booster seats were available for use and though we couldn't always sit together at a table for breakfast (the largest tables seat 4 people), we were always able to sit somewhere in the large breakfast area that including a couch, some side chairs, a coffee table, and a large flat panel TV on the wall. I read from others that the pool was small and they were correct. It is quite small with a maximum capacity of 17 people and the hot tub is listed as holding 3 (we obviously ignored that!). But, for us, smaller is better. It is so much easier to keep an eye on the kids if they are close by. We could always see them no matter where they went in the pool area and with 5 kids, aged 1-7, that is very important to us! Overall, the hotel was excellent, a five star rating in my opinion. It was clean, quiet, the staff were friendly and helpful, the hotel is fairly new and completely non-smoking! It is located just minutes away from lots of shopping possibilities like Super Target, Bed, Bath and Beyond, Kohl's, Menards and Home Depot, about 10 miles from the Mall of America and Ikea and about 10 miles from the Minnesota Zoo. There are plenty of restaurants close by to choose from including one right in the hotel. For being so close to so many things, it is very quiet with no street traffic noise. Would we recommend this hotel to others? Absolutely! Would we stay at this hotel again? Most definately! So if you are contemplating visiting the Minneapolis area, check out the GrandStay Residential Suites Hotel in Apple Valley - you will not be disappointed!

(And, no, I was not paid to write this - I just thought you would like to know!!)

Friday, July 16, 2010

Kids Quotes

Heard as I was on my way out the door for a meeting:

RJ: Mom, I want to come with you!
Me: I am sorry, honey, you can't. This meeting is only for adults.
RJ: You are not an adult.
Me: I am not an adult?
Jay: No, she's a foxy lady!
RJ: No, you are just a mom!

Well, now I know!

Wednesday, July 14, 2010

Messenger Bags in Shades of Pink and Brown


I have about a million things to do before we leave next week for our Minneapolis vacation. Some of those things include cleaning (so the kind neighbour checking in on the place doesn't die from a heart attack at the mess that ensues around here), laundry (so we actually have clean clothes to wear while we are gone), making jam (yeah, not related to the trip but 27 jars is quite a feast - Bluebarb, Triple Berry and Carmine Jewel Cherry Jelly with some Raspberry to go), making cheesecake (for our homeschool co-op meeting tomorrow), cleaning out the van, packing, paperwork, attending my 10 year college reunion this weekend, having a photo shoot for a farming magazine, etc, etc, etc. While I was making this never ending list of things that need to be completed, I decided to add some sewing in there! By now you should know that I like to keep busy. Maybe a little too busy! Anyhow, here are the messenger bags I made for the girls. They needed a trip bag, a bag full of new (at least to them), fun and wonderful things to keep them entertained on the 7-8 hour van ride. I bought a kit a long time ago, sometime last year, and the kit contained all the fabric needed to make these two bags (or a wall hanging, a mini quilt or a pillow cover). I love how they turned out! Which one is your favorite? I am still trying to figure out mine!


Sunday, July 11, 2010

Happy Birthday, My Love!


Yesterday we celebrated the 34th birthday of the love of my life, my constant and steady love, my dearest husband, Jason! I am so thankful the Lord chose to make him and that He chose to bring him into my life! Jason is the steady and constant one in this crazy family. (You may not know it but I am the emotional up and down energetic one! When we were engaged, my mom said he was the piece of wood that I would bounce up and down on!) Some of the things that I love so much about him:

  • the way he can be content with so little

  • the way he can walk up to a complete stranger, engage them in a conversation and make them feel like they are important

  • the way he makes me feel beautiful no matter how ugly I feel

  • his gorgeous smile

  • the way he makes us laugh

  • the way he loves our kids and plays with them

  • the way he loves me

I could go on and on but . . . well, you get the point! I asked him if he wanted to go out or have me make one of his favorite meals - he opted to stay in so I made curried chicken, something he loves! And, for dessert, I made this beauty - White Chocolate Strawberry Cheesecake. Jay loves fruit and white chocolate and cheesecake so this was the perfect combination. (Recipe at end of post).

Finally, though it was Jay's birthday, he bought me a gift. Okay, so I might have indicated in a very subtle way that I would really like this but the fact is that he bought it! It will look splendid in the new house but we are enjoying it just the same here. The kids have spent hours on it and when they allow it, I enjoy it too! And, no, this picture is not of my house (though I really do like that zebra rug!).

WHITE CHOCOLATE STRAWBERRY CHEESECAKE


5/8 cup graham cracker crumbs

1/3 cup butter, melted

1/4 cup ground almonds

3 (8 oz) packages cream cheese, softened

1 (14 oz, 300mL) sweetened condensed milk

3 eggs

2 tsp vanilla extract

6 squares white chocolate, melted

1 cup strawberry puree

  1. Preheat oven to 300F. Combine crumbs, ground almonds and melted butter and press into the bottom of a 9" springform pan. Set aside.
  2. With mixer, beat cream cheese in large bowl until fluffy. Gradually beat in sweetened condensed milk until smooth. Add eggs one at a time, add vanilla; mix well. Add melted white chocolate and mix again. Divide the batter equally in two separate bowls. Stir the strawberry puree in one of them. Pour a little amount of the white chocolate batter over prepared crust, followed by the strawberry batter. Keep repeating this step till both batters are finished. With table knife or metal spatula, gently swirl strawberry batter through white chocolate batter to marble.
  3. Wrap the pan with foil paper and bake in a water bath for 1 hour 20 minutes or until set. Turn off oven. Cool in oven with door ajar. Chill at least 3 hours or overnight. Garnish as desired. Store leftovers covered in refrigerator.

Chantelle's notes:

* The original recipe had some of the measurements as cups and some as grams. I made the appropriate conversions where necessary.

* I made my own strawberry puree by taking fresh strawberries and pureeing them in a blender, adding a little water for ease of mixing, then straining out the seeds. I also added a couple of drops of strawberry extract to up the strawberry flavor. Next time I would add a couple drops of red food coloring to up the pink color.

* The original recipe called for 100 grams of white chocolate. I upped that to 6 squares (1 box) as indicated in the recipe.

* I never wrap my pans in foil or bake them in a water bath. My cheesecakes still turn out wonderfully. It is your choice.

Wednesday, July 7, 2010

Potty Training Success!

On June 22 (2 weeks ago), I decided it was time to potty train almost 3 year-old Ali. I had actually thought about doing it way earlier, like in winter, but decided summer was a better time with dresses and shorts and she could comfortable run around in underwear if necessary. I was trying to cut down on all the laundry I would have to do when she would frequently wet herself. Turns out, I need not have worried. That little lady was a big girl in hiding! On day one, she wet herself once, day two she wet herself once. I think she has been dry every day since! By day three, I was no longer using a timer and she was coming in from playing outside on her own to use the bathroom. Unbelievable! None of my other kids were that easy to train! Not only has she been dry during the day, she is waking up dry at night. Not once, ever, did she wake up with a dry diaper previous to this. Now she is dry at night! However, her being dry at night is causing a lot of tears on the part of big sister RJ because she is still not consistently dry at night. Actually, before training Ali, RJ was always wet at night. Now she will be dry for a couple of nights, then wet a couple, etc. I am really hoping that when we go to Minneapolis in about 2 weeks, I will only have to bring diapers along for baby girl Ari.

So, what is our technique for potty training success? Well, I have used the same method for all the kids and this is what works for me.


  • First, you put out the potty a long while before you are planning to train. Get them used to it. Let them sit on it whenever they want. If they pee in it, great! If not, no big deal. You are just getting them used to it and letting them explore it. Our potty has sat out for a long while already and she would come and pee on it every once in a while. We weren't pushing anything.

  • Pick a day when you are going to start the training and tell the little trainee all about it. Let him/her know what day it will be and make a big deal of it. Choose a day when you will be home all day. Ideally, choose a weekend when you will be home all weekend. Training a child to use a washroom while you are busy running around from here to there is asking for trouble! I usually wait until the child is at least 2 years old (obviously with Ali I waited longer than that - I didn't feel like training her when she turned 2) because success requires a little less work.

  • Gather your supplies. You will need training underwear (it is thicker and contains pees a little better than normal underwear), a timer, a potty chart, lots of fun stickers, a basket of books and some Smarties.

On the morning of the first day of training, put underwear on the child, take them to the potty and let them sit for no more than 5 minutes. You don't want them to hate the potty by banishing them to it all day! Read a book to them from the book basket. If they are successful in peeing, whoop and holler, clap your hands and make a big production about how great it is they peed in the potty! Allow them to choose a sticker to put on the chart. Set the timer for 30 minutes. When the timer beeps, repeat the process. If they do a larger job in the potty, whoop and holler, make a big celebration, give them a sticker and 3 Smarties. Set the timer and repeat the process.

Now, about the timer. Some children have larger bladders and pee less frequently. You know your child - adjust the timer accordingly. Some of my kids went pee every 15 minutes when they were training. Ali could go at least an hour, if not more.

If the child wets themselves, don't punish them. Don't get mad at them. Just clean it up. They feel bad already - don't make them feel worse. Most certainly don't call them a bad child for wetting themselves. They are just learning and their self-worth should not be tied to whether or not they can pee on the toilet (this is speaking from experience!). Remember, some days will be better, some will be worse. If you wait until the child is a little older, like I did with Ali (she will be 3 in August), the training will be that much easier. So, you can either fight the battle when they are younger or wait a bit longer and see how much easier it is. Your choice!

Some people give their trainees a lot to drink to encourage the peeing - never worked for me. Some people give the trainee special underwear, like Buzz Lightyear or Princess, as incentive for staying dry. Never worked for me. Some people use pull-ups during the day instead of underwear so there is less to clean up in the case of an accident. Just so you know, kids are smart. They see it is a glorified diaper and peeing in it makes no difference to them. Skip the pull-ups and use the underwear. It works better (in my opinion). Actually, the same is true at night. My oldest son, when he was training, kept calling the pull-up a diaper. We decided to go straight to underwear at night (which meant washing wet sheets) and after 2 wet nights, he stayed dry. I guess I should try the same thing with RJ!! Some people make the child use a potty seat on the toilet instead of a potty on the floor - your choice but my kids couldn't get down from the seat afterwards. So, for us it is a potty on the floor.

Now you know how I have successfully trained 4 of my kids (yikes, that means only one left in diapers! Yippee! Though that makes me a little sad because I do so love those itty bitty babies!). Best of luck to you! And remember this, they will eventually learn how to use a toilet - all successful business men and women, all mothers and fathers, know how to use the bathroom. And your little one will learn,too!

Monday, July 5, 2010

I Installed a "New" Toilet & Sink

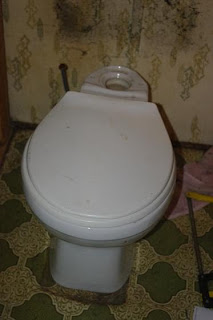
Remember at our new country property there is a house trailer? Well, it is not in the greatest condition and I find it a bit gross. Creepy. We haven't had the water hooked up until last week so everything was getting dirtier and everything that was dirty had yet to be cleaned. Now, we have no intention of living in the house trailer. Not that I am opposed to house trailers - my parents lived in one for 6 years when they managed a Bible Camp down in Minnesota and I lived with them for 1 year. However, this house trailer is in need of a lot of loving and there is no way 7 of us could fit in there! Anyway, the bathroom is used often everytime we go out there to do some work. It was a gross bathroom. I told the kids not to touch anything as I was afraid they would get sick. Granted a lot of bleach might have made it somewhat more acceptable. However, the float in the toilet was broken so it ran all the time and the tap in the tub never turns off so it is always running water. The sink was rusty. I wanted new fixtures so I got new fixtures. Well, new to me. We bought a sink ($10) and a toilet ($25) at the local MCC store and I was determined to replace them myself. I googled how to do it (check out this link, this link, and this one) gathered my supplies and set about the job. I figured if something went wrong it wasn't such a big deal. No one was needing the bathroom for a few days!

Here is what the toilet looked like before. A beauty, isn't she? I just love the green and turquoise combination! (Check out that wallpaper and vinyl flooring!)


I removed the tank


then the toilet bowl!


I replaced the bowl with a "new" white one


and a matching white tank!


Isn't she so pretty (check out that fantastic silicone job at the base of it!) Now, truth be told, I have taken off and replaced that tank about 8 times. And I have to do it one more time. It kept leaking! Just a little note: if you are replacing a toilet with another used toilet, be sure to buy a new spud gasket and new tank-to-bowl bolts rather than reusing the old. It will make a world of a difference, you won't be mopping up water continually and nothing will leak. I bought a new spud gasket (in case you are wondering, it is the large "washer" that goes between the tank and the bowl) but apparently I should have chosen a different kind. After talking with my dad (who, incidentally, is a plumber!) I know which gasket to buy to solve the very minor leaking that occurs only when the toilet is flushed. You may be wondering why I didn't get my dad to do this job. Well, he is extremely busy for starters but come on! Not much of a DIY project if my dad does it, now is it? :) If you know me at all, you know I love to do things by myself! I wanted to figure it out and I did! I am extremely proud of myself (and, contrary to some of the tutorials, it most certainly does not take 5-6 hours - maybe 1 1/2 hours!). While I was at it, I also replaced the bathroom sink with a "new" white one that already had a shiny set of taps on it! I didn't bring the camera with me so no pictures of it. Just know that the green sink and green toilet were a match! I had to replace the pop-up drain assembly on the "new" sink, take out the old sink and put in the new. It all worked on the first try! So, with a coat of paint that I bought at MCC as well for the walls and the vanity, the bathroom will go from green and gross to quite acceptable. And I learned how to install a toilet and sink in the process (which, by the way, is very easy! If you can follow simple instructions, you can do it, too!)

Sunday, July 4, 2010

Quick Apple Rhubarb Turnover

I love rhubarb and I love looking for new recipes that incorporate it. I found this recipe on the Canadian Living website and it is very quick, easy and delicious! I thought I would share it with you! And, yes, because it is low on sugar, I can enjoy it too!


2 apples, peeled, cored and thinly sliced
1 cup chopped rhubarb
1/4 cup granulated sugar
2 tbsp all-purpose flour
1 tsp lemon juice
1/4 tsp cinnamon
Half pkg (450 g pkg) puff pastry
1 egg yolk
2 tsp granulated sugar

1. Line rimmed baking sheet with parchment paper; set aside. In a large bowl, toss together apples, rhubarb, sugar, flour, lemon juice and cinnamon.

2. Unroll pastry onto prepared pan. Spoon apple mixture lengthwise along half of the pastry, leaving 1/2 inch border uncovered. Whisk egg yolk with 1 tsp water; brush some over border. Using parchment paper to lift, fold uncovered pastry over filling; with fork, press edges to seal. Brush top with egg wash. Cut 4 evenly spaced 2-inch slashes on top; sprinkle with sugar.

3. Bake in centre of 375F oven until golden and filling is tender, about 40 minutes.

4. Let sit awhile before serving as the filling is extremely hot. Serves 6-8.

Chantelle's notes:

*Sometimes I use only 1 apple and 2 cups of rhubarb. Makes it a little more tart but oh-so-yummy! And I never peel the apples!

*Rather than using an additional sheet of parchment paper, I simply use the paper the puff pastry is on.

*I recommend using all-butter puff pastry which is sold boxed in rolls. I buy President's Choice brand from Superstore and stock up on it when it is on sale!

*Knowing that the filling is a large amount for the size of the pastry, I gently roll the pastry a little larger with a rolling pin before adding the filling. Just my preference!

*Finally, I only sprinkle 1 tsp of sugar (if that) on top before baking.

Friday, July 2, 2010

"Welcome Home" Gripset

As usual, when we get into Steinbach for some grocery shopping, I try to get to Liquidation World (LW) . I mentioned that store in an earlier post when I found a few wonderful Project 2012 goodies there. Well, I added to the collection today! As we were wondering around, I had just popped some collapsible fabric storage baskets ($5.88 ea) for the girls into the cart when I spotted this:


We now have our entrance gripset! I love that the hardware series is called "Welcome Home" by Weiser and it makes me extra excited for building our house! This is the door handle every guest who graces our home will use! This is one of the first things they will see when they step on our porch and stare at our door, waiting for us to answer! It is starting to become more real with every piece we buy. And it is still 2 years away. I think Pepe is beginning to realize there is going to be a lot of shopping for the next house because he asked just how many things for the next house we needed to buy! Anyhow, at $88.88, once again, this is a bargain of a price. I found the same gripset in a different finish at Home Hardware for $179.99. So, once again, we saved over 50% off the regular retail price! Yippee!
And, finally, I bought 29 packages of upholstery nails! They are made by the Bulldog Hardware Company of Memphis, TN, they come in 3/4 oz clamshell packs, and are nickel colored. At about 20 nails per pack, I have over 550 upholstery nails to use somewhere at sometime. At $0.25 a package, it was too good to pass up! That's only $7.25, people! So, once again, a trip to LW was worth every penny!

My Latest MCC Treasures!

It really does pay to pack up the kids and visit the local (very, very good!) thrift store at least once a week, if not twice! I went on Tuesday and again today! On Tuesday I didn't buy one.single.thing! Very, very unusual! In fact, that may be a first. Today, however, was different! I bought some paint, some 3' (?) spindles that will come in handy somewhere at sometime, a gardening book and two of these:


I love them! They have a leopard look to them, which I totally adore! They glow ever so nicely when they are lit and they make a little bit of a look-at-me statement! Somewhere in the next house they will find their home. For now, they will stay in the box. Oh, and the price? $4 each. Yup, that is a bargain I can live with. I found a very similar one at Home Depot for about $30 so $4 is about 85% less! They were in a box that bore the picture of another pendant light but one that is really plain. Boring. I assume these were a little too "wild" for their liking! Their loss, my gain!


In order to easily test and see if these light fixtures I buy actually work, my wonderful hubby created a little "pigtail" for me. That way I don't have to wire the lights to see them in action.


All he did was take an old cord with a plug at the end and expose some wires for me while leaving about a 6' piece attached to the plug. I just join the exposed wires on that "pigtail" to the wires on the light fixture, plug it in and VOILA! However, you must make very sure the black and white wires don't touch each other. Remember, this is just a temporary thing to test the light! So, have you found any treasures lately?
Related Posts with Thumbnails