*** This post was originally written over 1 year ago and I have finally gotten around to posting it. Please see edits below. ***
When I was researching how to make concrete counter tops, it was nearly impossible to find good information on what "recipe" to use. So, as I gathered the little bits I could find, I combined it with the information available on each product I used and came up with a recipe. However, please remember, I am NO EXPERT! I have made exactly 1 counter top (though it was a really big one - 100 square feet!.). I have yet to take the molds off the counters, grind, polish and seal the counters but, I still think there is merit in sharing what we did and then you can take it or leave it! :)
First, let me share which products we used to make our counters. Quikrete makes a Counter Top Mix product that would be so easy to use. You simply add water and you have the perfect mix for counter tops. I did look into this option but found it to be really pricey. Here in the Winnipeg, MB area, it costs $48.99 for each 80lb bag AND it is only available at a Home Hardware store a 1/2 hour drive away to a little town. Home Depot does not carry it and will not order it in. Neither will Rona. I also checked my local hardware stores and they couldn't get it either. I checked numerous stores and only the small Home Hardware in Morris could order it for me. But, at almost $50 per bag, that option was too expensive since we were going to need 35 - 80lb bags. Instead, we made our own mix.
After reading about its merits, we decided to use Quikrete 5000. It is a high-strength cement mix readily available at building supply stores. We were able to get it from our supplier for $10 for each 60lb bag. From my reading, it was suggested to add 5lbs of extra portland cement to each bag of Quikrete 5000 to increase the cement content making the final product even harder, perfect for polishing. We certainly used this advice and ordered 4 bags of grey portland cement.
In order to make a counter top-worthy mix, we also needed to add fibers for strength and a superplasticizer to decrease the amount of water used in the mix, strengthening the final product. The fibers help reduce or eliminate cracks (as does the use of wire mesh and rebar) and the superplasticizer allows us to reduce the amount of water used in the mix, allowing for a stronger and harder final product. We were able to find our fibers and superplasticizer at the local ready-mix company. They were quite willing to sell us what we needed. We used Adva 140 for the superplasticizer (13L for $100) and Fibermesh 300 for our fibers (900g bag for $12). We followed the guidelines found on the products themselves when figuring out how much to use but altered as we needed.
Finally, I wanted the perimeter counters of our kitchen to be a dark charcoal color so we used Quikrete Liquid Cement color in Charcoal. This is a super thick syrup-like colorant that you can add to your cement to color it up. You need to shake it really, really, really well in order for it to mix nicely. We were able to find the quantity we needed at the Home Depot located on the farthest end of the city, naturally (14 bottles at $11.52 per bottle)! I had wanted to use 1 1/2 bottles per batch but I was short 1 bottle so we cut it back a little to make due with what we had. It still produced a lovely charcoal color.
We also added metal lathe to all areas of the counters. When pouring the concrete into the moulds, we poured a layer, added the lathe and then poured more concrete on top to ensure the lathe stayed in the middle of the concrete. On the overhangs on both the island and peninsula and around both sink edges, we also added rebar for extra strength.
Now that you know what we used, let me share the recipe. The recipe is for one batch, which we made in a concrete mixer - we made many batches until we had all the concrete we needed.
For the charcoal perimeter counters:
3 - 60lb bags Quikrete 5000
15lbs grey portland cement
750mL Adva 140
1 bottle + 125mL Quikrete Charcoal Colorant
30g fibers (I believe we cut this back a little because it was getting a little too fiber-y)
6L water (this changed a little bit, depending on the humidity of the cement but it was pretty close to this each time)
For the lighter colored island counter where we seeded glass on top after:
3 - 60lb bags Quikrete 5000
15lbs white portland cement
750mL Adva 140
15g fibers (we cut down on the fibers due to the glass we were adding)
6L water (once again, this changed a little bit, depending on the humidity of the cement but it was pretty close)
We wanted the island counter to be a very light grey so we lightened it up by using the white portland cement instead of the grey portland for the dark perimeter counters.
When we mixed our batches, we made sure to measure each product accurately using scales and measuring cups. It is important that each batch is exactly the same as the one before it so that the entire counter looks consistent. When mixing according to our recipe, you will produce a thick, sticky concrete mix that trowels really nicely. I will be sure to update when we have polished our counters to show you the final outcome.
As for the cost breakdown, I don't have all the numbers yet but this is where it stands now:
Quikrete 5000 - 44 bags @ $10 = $440
Grey Portland cement - 4 bags @ ??
White Portland cement - 1 bag @ ??
13L Adva 140 (we only used about 11L) - $100
Fibermesh 300 - 1 bag = $12
Quikrete Charcoal Liquid Cement Color - 14 bottles @ $11.52 = $161.28
1 YEAR LATER:
I sincerely apologize for not posting this a long time ago. Time has run away from me and I have had no time to blog at all. However, I know the help this can be and so I am wanting to share it with you.
When we made the counters, I was unsure how I was going to finish them. I knew that I wanted a shiny surface that looked wet at all times. I knew that I wanted the perimeter counters to be dark grey/black in color. I wasn't sure how to get that look so we did some experimenting. I used the diamond polishing pads to polish the perimeter counters and though it made it really smooth, it wasn't shiny. Though we had added the charcoal colorant to the concrete in the perimeter counters, I still wasn't impressed with the depth of the color. It also looked blotchy, which I didn't like. We remedied that by spraying the raw concrete with a black colorant meant for concrete floors. This is the product we used in the Obsidian color. We already had it on hand because we stained other concrete floors with it. I LOVED how it evened out the color of the concrete and made the counters much darker. I finally had the color I wanted so it was time to seal it. Knowing this, we would never have added the colorant to the concrete mix itself but that is one area where we lived and learned. As for the island, the glass did not allow me to polish it with diamond pads as it would have taken forever. Initially we used a concrete grinding disk to grind the glass down smooth and then used the diamond polishing pads to get it progressively smoother. Once we had the counters smooth, it was time to seal them. After doing some experimenting with products on our test piece, we finally choose to use an epoxy-type sealant. It was purchased at Menard's and was fantastic! It is a two-part system that you mix just before you apply it. We had to ensure a dust-free environment so that was a challenge in a construction environment but we were able to do it. The epoxy was easy to use and gave me that glossy wet look that I wanted. The colors of the black counters and the glass really popped! There are a couple of places where I was unable to get the air bubbles out of the epoxy but I am okay with that. After using the counters for 1 year, I am still in love with them. Oh, sure, there are hairline scratches on the epoxy on the counters because they are used a lot but I can always recoat them with more epoxy anytime I want. I have seen absolutely no cracks in any area of the concrete counters themselves, including all the overhangs. And we use our counters a lot, even sitting on them!
To see final pictures of our kitchen and check out what the counters look like, see this blog post of our Kitchen Tour.
Tuesday, March 18, 2014
Monday, August 12, 2013
Our House Plan - Main Floor
It has been requested before that I share the floor plan of our new house. And it makes sense. I often wonder about the flow of other people's homes since it is much easier to picture where everything is in relation to everything else. So, with very little preamble, here it is! This is the main floor of our house and though we tweaked a tiny bit here and there when we actually built, it is almost exactly like this.
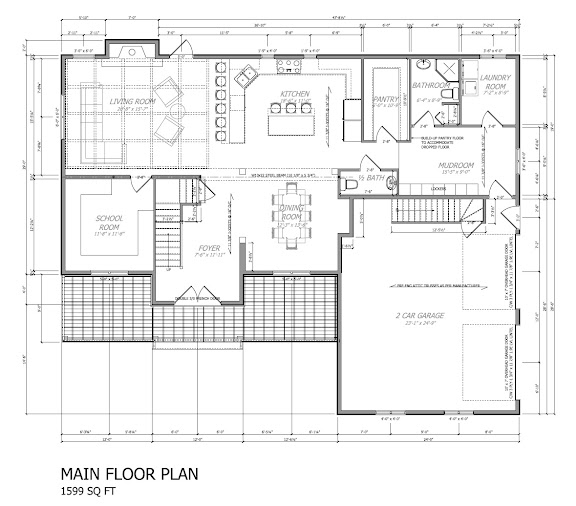


This is the floor plan we had in mind for years. We found a similar version online a number of years ago and started tweaking it to our liking. No matter how many floor plans we looked at, either online or in books, and we looked at MANY, this was the one we liked best. And we still love it! We had contemplated adding the master bedroom to the main floor so that when we are old and decrepit we wouldn't have to climb stairs but nixed that idea for now. Stairs will be good for our hearts, right? Actually, if we are too old to climb stairs, we are also too old to take care of 5 acres so that is probably when we would move anyway.
The amount of space on this main floor is 1 1/2 times the size of our other main floor. And you know what? We love the space. At supper the other day, the kids were just saying yet again how much they love all the space in our new house. And I agree completely! As for cleaning it? Well, we are still working out the logistics of that. Kinda hard to keep it dust free when we are still working on it. But I wouldn't give it up, dust and all, to go back to our town home. This is our forever home where we will raise our kids, visit our grandkids, and grow really, really old!
Next week I will share the upstairs and the week after, the basement.
Monday, August 5, 2013
House Tour - Kitchen
It has been a VERY long time since I have posted anything here but we have been understandable busy. As you know, we slept here in our new house for the very first time the Thursday before Good Friday, just before Easter, which was March 28. That means we have been in the house for just over 4 months. Which is very hard to believe since time has flown by so quickly. But we absolutely LOVE being here.
In that time, we have tried to keep working away at the large list of unfinished projects. But other things in life keep coming up and put DIY projects on hold. First, we had to sell our town house which meant we had to pack everything up and move it out, clean the whole thing and get the main floor repainted. That was a lot of work! But once we held our one and only open house (we sold privately), we had an offer, which we accepted, the next day. So, the process of selling the house went super fast. Cleaning it all out was another story.
Once the house was sold, it was time for me to catch up on all the 2012 paperwork for the farm that I didn't do while building our home. So, that meant everything from April-December of 2012 needed to be entered into the computer, reconciled, etc. and handed in to the accountant so she could have it filed before June 30, which is tax deadline. We made it but not with many days to spare.
Once the paperwork was done, I had 4 flower girl dresses to sew for my niece's wedding, which was mid-July. That took a bit of time but it was sure fun to pull out the sewing machine again. That is, once I found all my sewing supplies, which were still packed in boxes in various parts of the house.
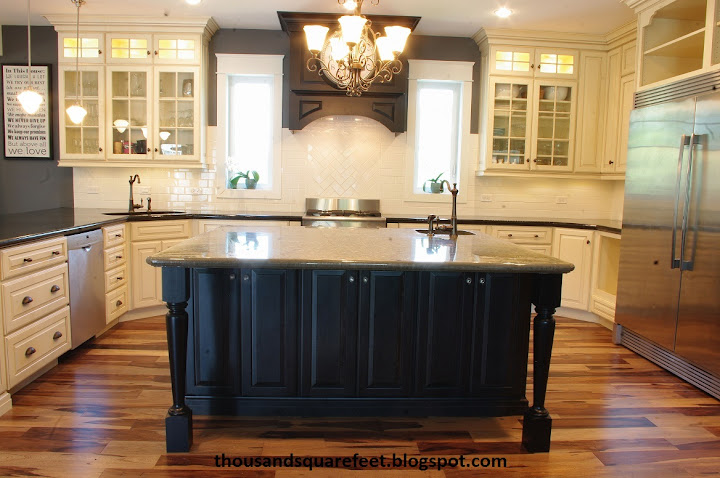
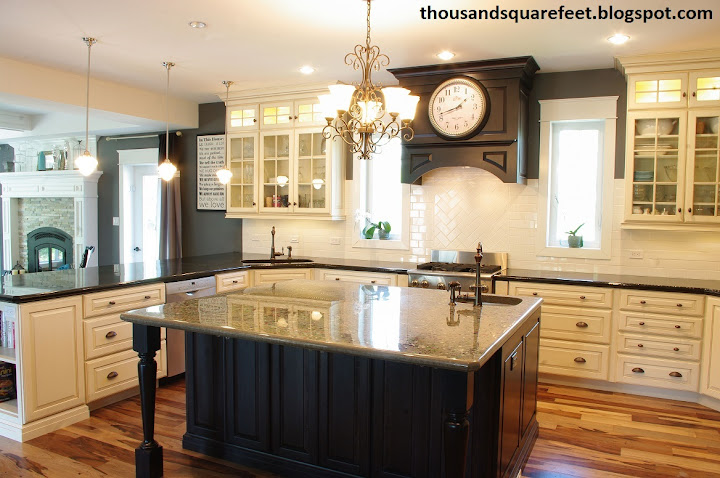
That bring us to about now. In between gardening and canning, I am currently working on the school room. That is the room at the top of the priority list since I hope to start schooling again at the end of this month or the very beginning of September. I have already installed all the cabinetry and am currently working on making the desktops. More on that on another post on another day sometime in the future. For today, I wanted to show you the kitchen. My kitchen designer kept bugging me for photos for her portfolio so I took some time last month to take some photos and thought I would share them with you. This room, this kitchen, is a dream-come-true kitchen for me and it has already been very well-used. We have hosted a bridal shower, Mother's Day and Father's Day gatherings, baked many batches of cookies and buns, canned many, many jars of jam and made amazing meals for friends and family. It is a wonderful place to be and I am not sure I would change one.single.thing.
Without further ado, here is our kitchen. Truly, it is the heart of our home.


In that time, we have tried to keep working away at the large list of unfinished projects. But other things in life keep coming up and put DIY projects on hold. First, we had to sell our town house which meant we had to pack everything up and move it out, clean the whole thing and get the main floor repainted. That was a lot of work! But once we held our one and only open house (we sold privately), we had an offer, which we accepted, the next day. So, the process of selling the house went super fast. Cleaning it all out was another story.
Once the house was sold, it was time for me to catch up on all the 2012 paperwork for the farm that I didn't do while building our home. So, that meant everything from April-December of 2012 needed to be entered into the computer, reconciled, etc. and handed in to the accountant so she could have it filed before June 30, which is tax deadline. We made it but not with many days to spare.
Once the paperwork was done, I had 4 flower girl dresses to sew for my niece's wedding, which was mid-July. That took a bit of time but it was sure fun to pull out the sewing machine again. That is, once I found all my sewing supplies, which were still packed in boxes in various parts of the house.
That bring us to about now. In between gardening and canning, I am currently working on the school room. That is the room at the top of the priority list since I hope to start schooling again at the end of this month or the very beginning of September. I have already installed all the cabinetry and am currently working on making the desktops. More on that on another post on another day sometime in the future. For today, I wanted to show you the kitchen. My kitchen designer kept bugging me for photos for her portfolio so I took some time last month to take some photos and thought I would share them with you. This room, this kitchen, is a dream-come-true kitchen for me and it has already been very well-used. We have hosted a bridal shower, Mother's Day and Father's Day gatherings, baked many batches of cookies and buns, canned many, many jars of jam and made amazing meals for friends and family. It is a wonderful place to be and I am not sure I would change one.single.thing.
Without further ado, here is our kitchen. Truly, it is the heart of our home.
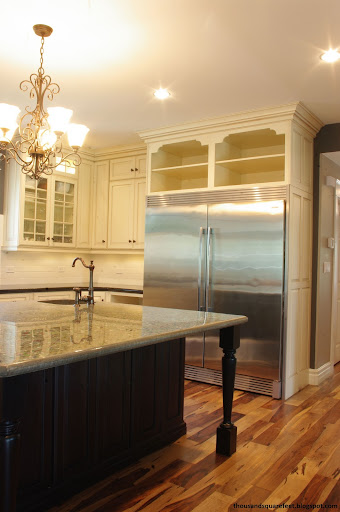
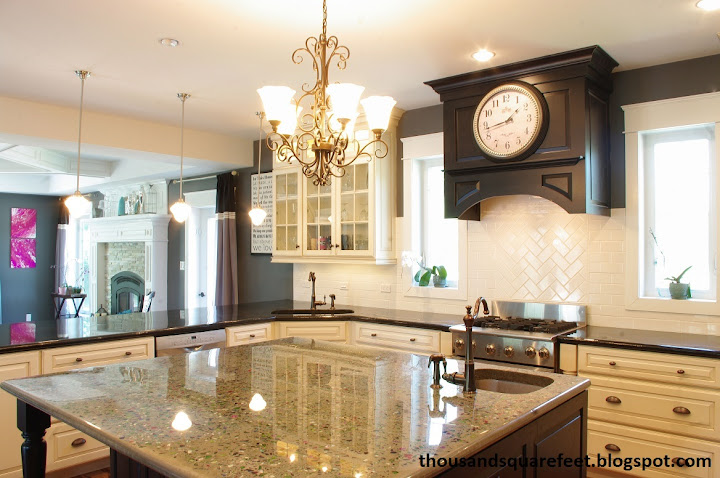
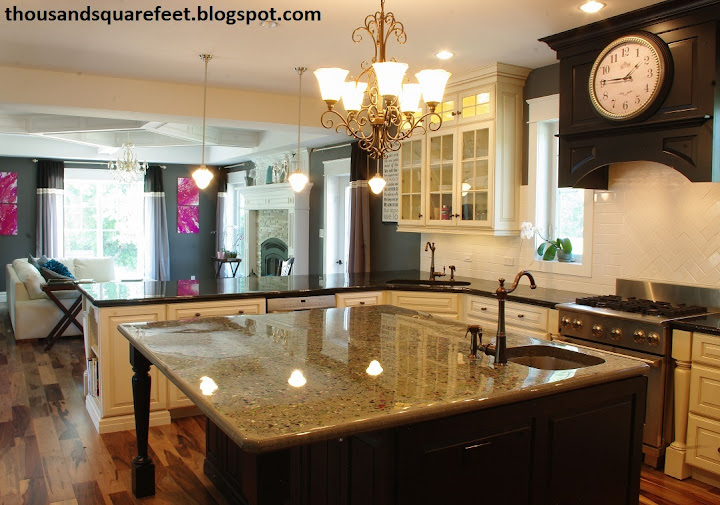
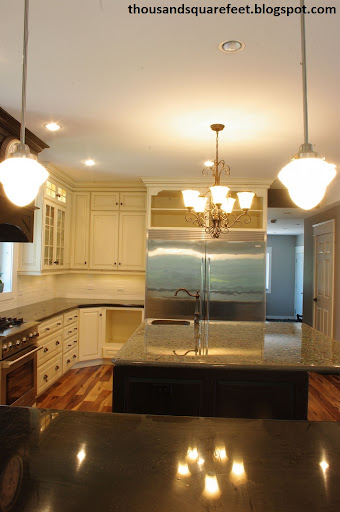
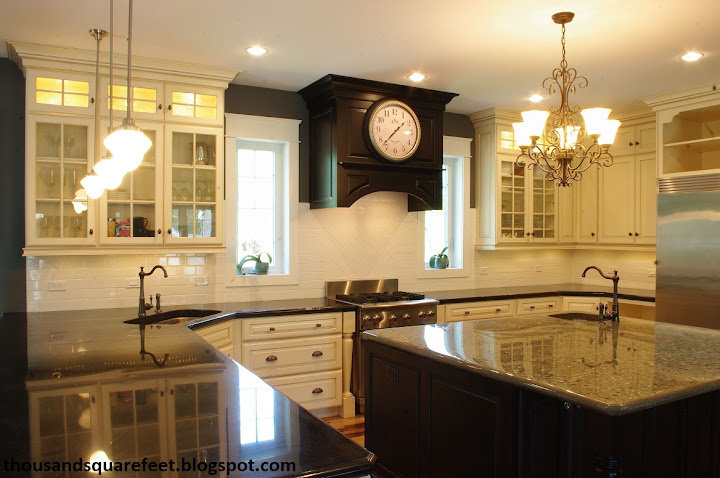
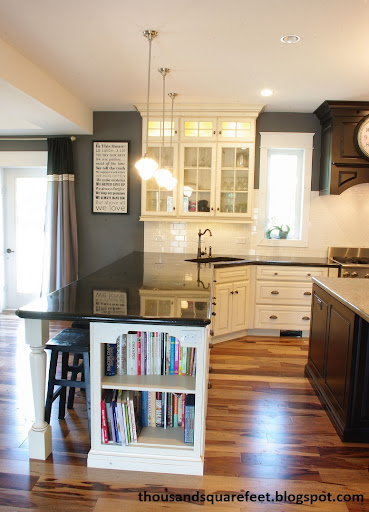
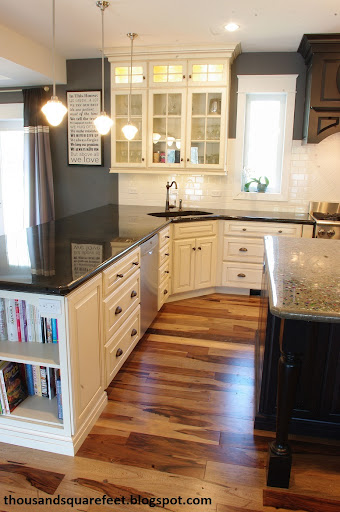
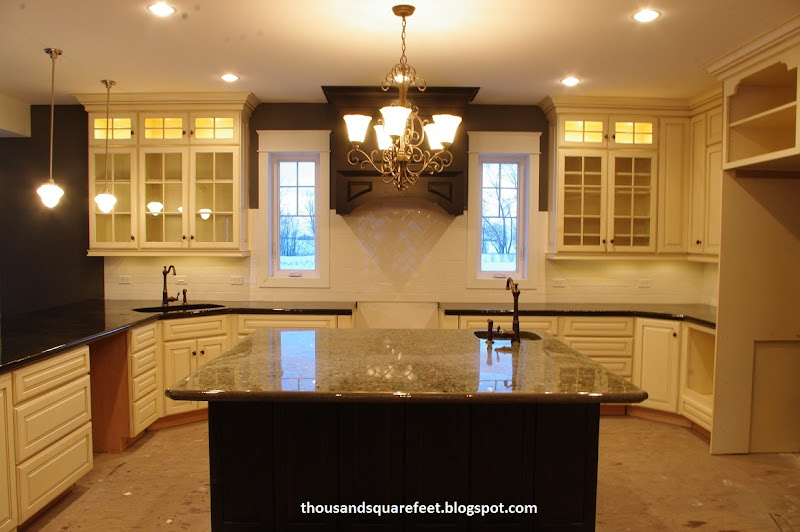
When you look at this kitchen, you may not realize how many things we did ourselves. First of all, I designed this kitchen long before we even started building the house. As a matter of fact, we ordered the kitchen before we even had a hole in the ground. I may have had a kitchen designer but I knew exactly what I wanted and just told her where to put things.
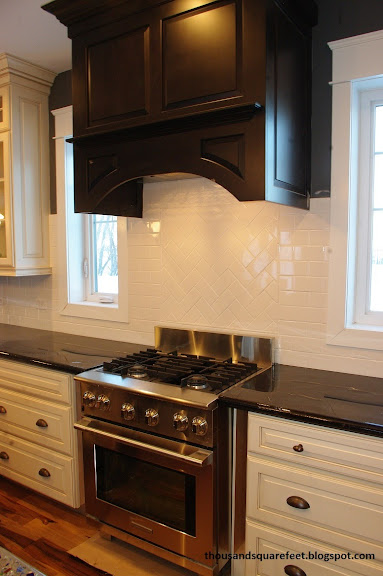
This is the kitchen I dreamed about after looking at many, many kitchen books and magazines. The upper cabinets with glass doors? Check! Lighting in the very upper cabinets? Check! Painted and glazed cabinetry? Check! White subway tile backsplash? Check! Pullout spice racks beside the stove disguised behind pillars? Check! A large mantle-looking exhaust cover? Check! Bookshelves for cookbooks? Check! Pillars supporting both the overhanging peninsula counter and island counter? Check! Places at the counter for all of us to sit? Check! Garbage pullouts in the kitchen? Check! Loads of storage? Check, check, check! This kitchen is loaded with everything I wanted.
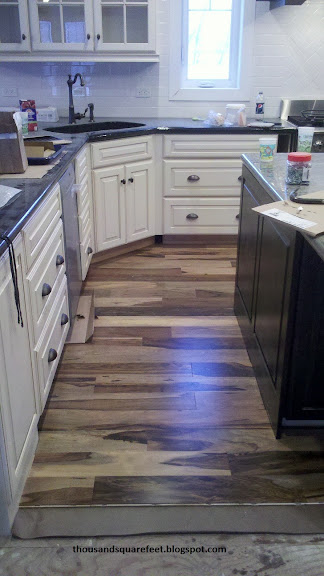
Then, after building the house, we installed the kitchen cabinets ourselves, along with Mr.W. Once the cabinets were in place, we made the concrete countertops. Yup, all the counters in the kitchen are concrete and they are unbelievably beautiful! They are easy to work on, easy to clean, and rolling out dough on them is so nice thanks to their super-smooth-and-shiny surface. After the counters were done, I tiled the whole backsplash and installed the under cabinet lighting while hubby installed our Brazilian pecan floors. Once those were done, I installed all the knobs/pulls on the cupboards and the toe kick at the bottom. I plumbed and installed the dishwasher and put together the fridge/freezer surround. Nevermind that I wired and hung all the lights, painted the walls and built and installed all the mouldings around the windows. This may look like your normal, ordinary, everyday kitchen but to me it is a labor of love, sweat and maybe, just maybe, a few tears.
This is the kitchen I dreamed about after looking at many, many kitchen books and magazines. The upper cabinets with glass doors? Check! Lighting in the very upper cabinets? Check! Painted and glazed cabinetry? Check! White subway tile backsplash? Check! Pullout spice racks beside the stove disguised behind pillars? Check! A large mantle-looking exhaust cover? Check! Bookshelves for cookbooks? Check! Pillars supporting both the overhanging peninsula counter and island counter? Check! Places at the counter for all of us to sit? Check! Garbage pullouts in the kitchen? Check! Loads of storage? Check, check, check! This kitchen is loaded with everything I wanted.
Then, after building the house, we installed the kitchen cabinets ourselves, along with Mr.W. Once the cabinets were in place, we made the concrete countertops. Yup, all the counters in the kitchen are concrete and they are unbelievably beautiful! They are easy to work on, easy to clean, and rolling out dough on them is so nice thanks to their super-smooth-and-shiny surface. After the counters were done, I tiled the whole backsplash and installed the under cabinet lighting while hubby installed our Brazilian pecan floors. Once those were done, I installed all the knobs/pulls on the cupboards and the toe kick at the bottom. I plumbed and installed the dishwasher and put together the fridge/freezer surround. Nevermind that I wired and hung all the lights, painted the walls and built and installed all the mouldings around the windows. This may look like your normal, ordinary, everyday kitchen but to me it is a labor of love, sweat and maybe, just maybe, a few tears.
You may be wondering, is my kitchen always this clean? Absolutely not! Our kitchen is very lived in, well used, and often holds 7 people working in it. But, I do like to have counters that aren't cluttered. As of yet, I haven't found the perfect decorating pieces for the counters so they are empty . . . for now. As things change, I will be sure to keep you informed. But I hope you enjoyed today's tour anyway. Hopefully, I can show you more rooms in the house soon as they are finished up and I promise to include a full floor-plan as well so you can see how each room interacts with the next.
Sources:
Cabinetry - Medallion Cabinetry, Brookhill Style, maple wood; the island and range hood are in the Onyx stain and the rest of the cabinets are painted Morel with a Burnt Sienna glaze (ordered through McDiarmid Design Center)
Flooring - Triangulo Engineered Brazilian Macchiato Pecan 1/2" x 5 1/4" (ordered online)
Backsplash Tile - white 3"x6" subway tile (purchased at Menards)
Wall paint - Benjamin Moore 'Overcoat' (purchased at Janzen's Paint in Steinbach)
Countertops - DIY
Appliances - stove: Electrolux Icon Dual Fuel; All-Refrigerator: 19 cu ft. Electrolux; All-Freezer: 19 cu ft. Fridgidaire; dishwasher: Bosch (stove, fridge, freezer are scratch & dent from Bain's Appliance Repair in Winnipeg; dishwasher was a sale purchase from Wien's in Niverville)
Windows - Durabuilt (ordered through their Winnipeg office)
Monday, April 8, 2013
We Have Moved!!
Thursday, March 28, 2013, we officially moved into our new house! Well, we moved all the beds and larger furniture and slept there. Then we spent the Easter weekend at gatherings. After Easter, we went back to the "old" house and packed more things and brought them to the new house. We have now been there just about 1 1/2 weeks and we LOVE it! It is home. Each day we try to unpack boxes while continuing to finish the house. I just finished the kid's vanity in their bathroom the other day and now I need to work on the vanity in our bathroom. But the house is completely functional and we have already had people over on a couple of different occasions. This week we host some friends for supper and host a bridal shower for my niece. The house as it is is completely functional even if it is still slightly unfinished. But, we don't have internet at the new house. So, I have been slightly absent since I don't come back here ("old" house) very often. Hopefully that will be remedied soon. In the meantime, I will take plenty of pictures, work hard to finish up the unfinished project (which will take a long time, I am sure) and share them with you when we actually have internet. Just wanted to share the good news with you in the meantime.
Monday, February 18, 2013
A Few Snippets of the House
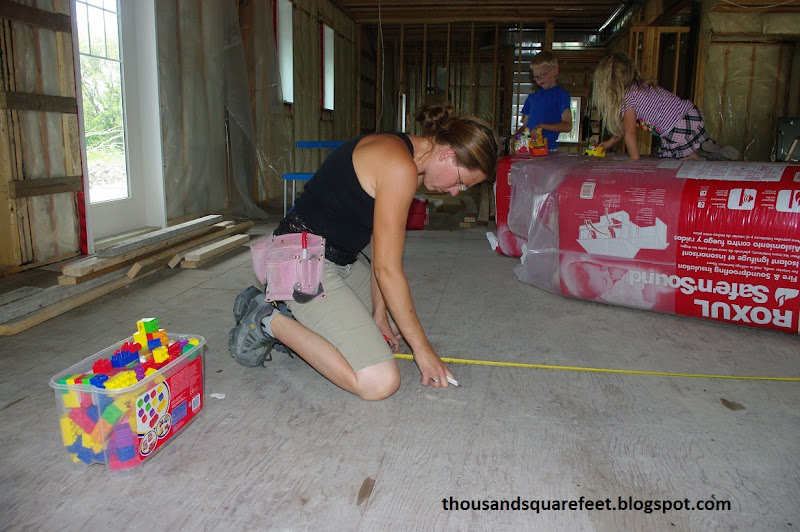
It has been a long while since I have posted but it is only because we are working hard to get the house completed this month. I have put in long hours while Jay continues to work hard at all the jobs he has. Progress continues to happen - some days more quickly than others. Today there is a lovely blizzard happening here (well, not so much snow but such strong winds that it is blowing all the snow around - roads are closed so we are stuck at home) that I thought I would give you a quick photo update to show you the latest happenings.
Sealing the kitchen counter tops was top priority because so many things were riding on that decision. It took many hours of research and fretting on my part but I finally decided to go with an epoxy-type sealer for the counters. And I am SO glad I did! I love how smooth and shiny it has made them. Prior to sealing the exterior counters, I stained them black with the same stain I used on the basement and mudroom floor. I was just not satisfied with the color the concrete was prior to that. The stain really evened it out and gave me that contrast to the island counter top I was hoping for. Once the counters were sealed, which was really not hard to do, I could finish up the tiling and grouting of the back splash and Mr. W installed the sinks and faucets. I just love how it all turned out. Once the back splash was complete, we re-installed all the lower cabinet doors and drawers and I attached some of the pulls and knobs as well. The kitchen is really coming along nicely.
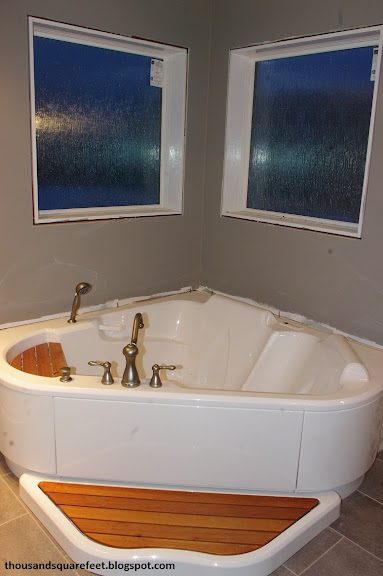
Our master bath is shaping up nicely. The air massage tub we purchased about 1 1/2 years ago off Kijiji and the roman tub faucet I found for a steal at Liquidation World combine to make a wonderful addition to our bathroom. They are all hooked up and functioning perfectly. I have already had a bath in this tub and it.was.glorious! I have since installed the casings on the windows.
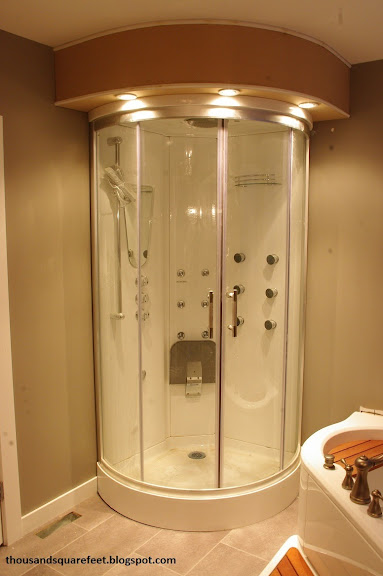
The corner shower in our en suite is a lovely European thing that I haven't yet tried out. It has many body jets plus a large rain shower head so it could be fun! Mr.W installed a curved ceiling with lights above it to add some flare! It just needs to be painted.
Jason worked hard on and off for a few days to complete this shelving in our main floor pantry. This walk-in pantry is right next door to our kitchen and is going to be so lovely to use. He says it looks kind of out of place since the rest of our house looks much fancier and this is just functional. I am totally fine with functional! It just needs a bit of touch up paint but other than that it is good to go! We also installed a couple of base cabinets along with a butcher block counter on the opposite wall to create a sort of "butler's pantry" area - a place for the toaster, extra crock pots, food for when large groups are going to be coming over, etc. I think it will come in very handy. You can just see it on the right of the photo.


And, as a final photo for today, I am not sure if I have ever shown you the panel detailing that is going up our main staircase. Mr.W did all the work himself and it looks so lovely. He also made our handrail and installed the newel post so now we just need the spindles. I have stained the handrail but will add one more coat to darken the color. As for the panelling, I have since primed it and it totally changes the look of the staircase.

Sealing the kitchen counter tops was top priority because so many things were riding on that decision. It took many hours of research and fretting on my part but I finally decided to go with an epoxy-type sealer for the counters. And I am SO glad I did! I love how smooth and shiny it has made them. Prior to sealing the exterior counters, I stained them black with the same stain I used on the basement and mudroom floor. I was just not satisfied with the color the concrete was prior to that. The stain really evened it out and gave me that contrast to the island counter top I was hoping for. Once the counters were sealed, which was really not hard to do, I could finish up the tiling and grouting of the back splash and Mr. W installed the sinks and faucets. I just love how it all turned out. Once the back splash was complete, we re-installed all the lower cabinet doors and drawers and I attached some of the pulls and knobs as well. The kitchen is really coming along nicely.
Our master bath is shaping up nicely. The air massage tub we purchased about 1 1/2 years ago off Kijiji and the roman tub faucet I found for a steal at Liquidation World combine to make a wonderful addition to our bathroom. They are all hooked up and functioning perfectly. I have already had a bath in this tub and it.was.glorious! I have since installed the casings on the windows.
The corner shower in our en suite is a lovely European thing that I haven't yet tried out. It has many body jets plus a large rain shower head so it could be fun! Mr.W installed a curved ceiling with lights above it to add some flare! It just needs to be painted.
Jason worked hard on and off for a few days to complete this shelving in our main floor pantry. This walk-in pantry is right next door to our kitchen and is going to be so lovely to use. He says it looks kind of out of place since the rest of our house looks much fancier and this is just functional. I am totally fine with functional! It just needs a bit of touch up paint but other than that it is good to go! We also installed a couple of base cabinets along with a butcher block counter on the opposite wall to create a sort of "butler's pantry" area - a place for the toaster, extra crock pots, food for when large groups are going to be coming over, etc. I think it will come in very handy. You can just see it on the right of the photo.

The big thing Jason and I worked on this past week was to install flooring! We finished installing the flooring in the kitchen so we slide our range and our dishwasher into place. I even used the oven for the first time. Hopefully this coming week, we can move our full fridge/full freezer into place as well. Then our kitchen will be completely functional.
Since the flooring in the kitchen was complete, it was time to move onto the living room. Even though Jay was sick and spent time moaning on the floor, he stuck with the job and together we were able to finish the living room. It looks so spectacular! We love our flooring and hope it holds up really well.
And, as a final photo for today, I am not sure if I have ever shown you the panel detailing that is going up our main staircase. Mr.W did all the work himself and it looks so lovely. He also made our handrail and installed the newel post so now we just need the spindles. I have stained the handrail but will add one more coat to darken the color. As for the panelling, I have since primed it and it totally changes the look of the staircase.
And that is a glimpse of where the house is at today. What do you think?
Wednesday, January 23, 2013
Pinspiration to Reality - DIY Coffered Ceiling
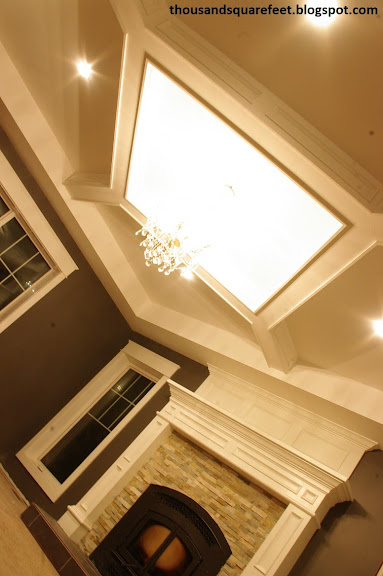
A long time ago, even before we started building the house, I would spend time online, figuring out the details of the house. I loved looking at Houzz for all the beautiful homes and ideas it showcased. It was often the place Jay and I could be found after the kids were in bed, figuring out how the staircase would work or what we wanted the kitchen to look like or a whole bunch of other things we needed to figure out. It was actually a lot of fun to hear what he liked and what he didn't. One time I stumbled upon a coffered ceiling (some people refer to these as box beam ceilings. It is only a regional difference in name referring to the same thing) unlike any other and I pinned it on Pinterest. It was stunning! I knew that ceiling was going to be in my house! It was written into the plans and I eagerly anticipated seeing it come to life.
Even before the drywall began, I drew out the ceiling plan on the floor. It is much easier to measure and mark on the floor then to measure and mark on the ceiling. Then we just used a laser level later on to transfer those marks to the ceiling. Easy peasy!!
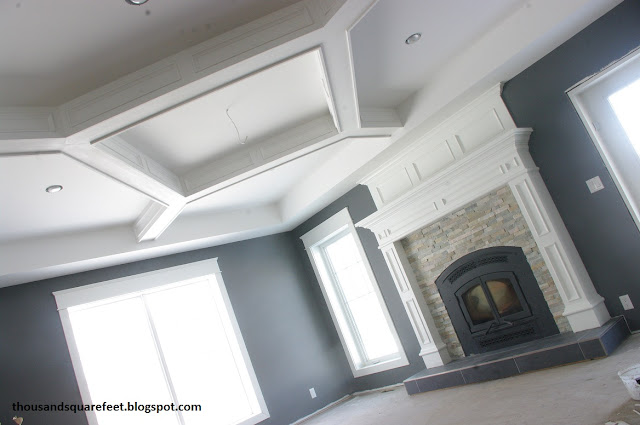
After the walls and ceiling had the drywall in place, we were sure to build bulkheads around the exterior of the living room to define the area of the coffered ceiling as well as define the living room area itself (plus hide some heating ducts). Our main floor is an open concept plan so this was a great way to separate the rooms without adding walls. Instead of using wood to create the framing for the bulkheads, we used metal angle brackets. They were simply long piece of "L" shaped aluminum. It was easy to attach them where we wanted. We needed to add small pieces of 2x4's for strength and backing for drywall but it was much easier doing it this way than using all wood. I did most, if not all, the framing of the bulkheads in the living room by myself, it was that easy.
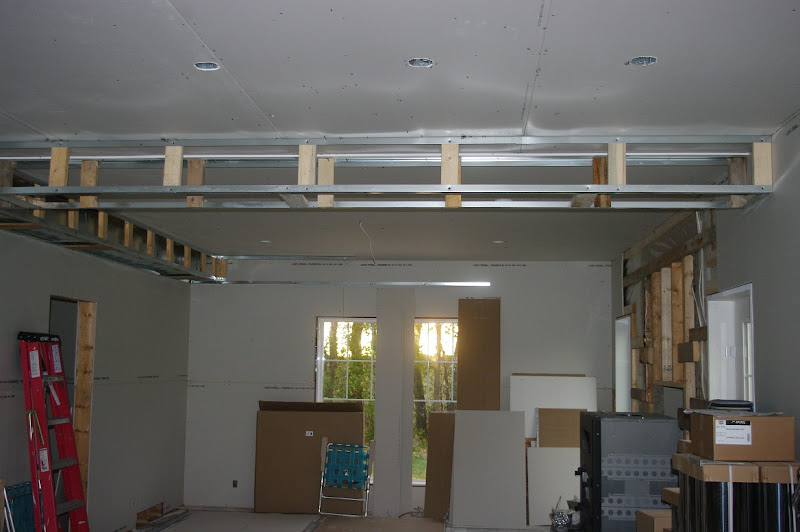
Once that was done and the drywall was installed on the bulkheads, 2x6s were attached to the ceiling in the location of the "beams". These would create the base for the coffered ceiling detail and is the wood to which all other pieces were attached.
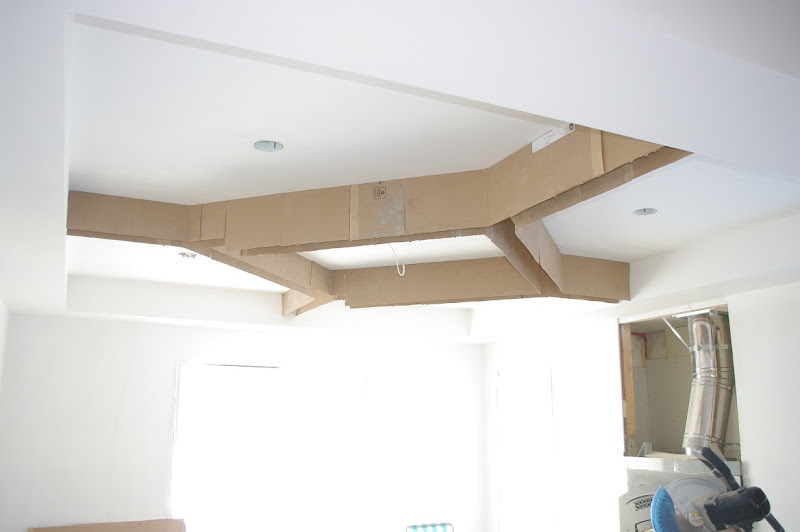
After the 2x6s were in place, we used cardboard to figure out the depth we wanted the beams to be.
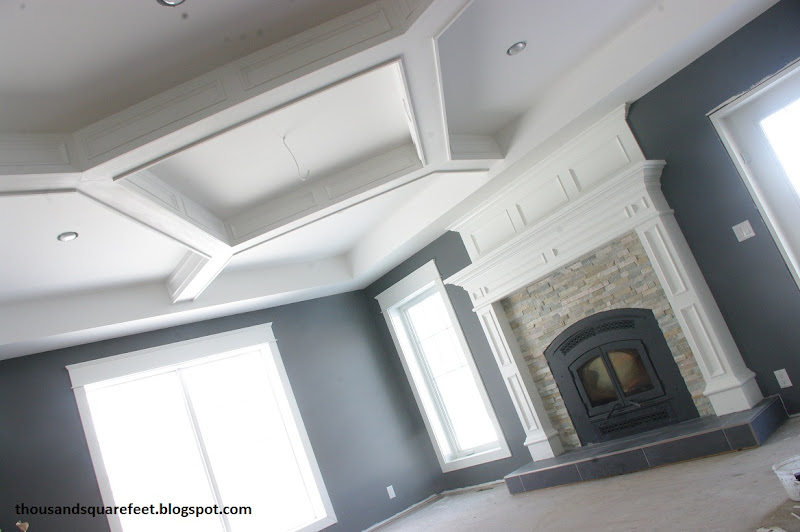
Once that was determined, we removed the cardboard (obviously!) and went to work adding all the MDF to the sides of the 2x6s, creating the sides of the beams. Additional MDF was added to create the bottom of the beams. Then extra pieces were added on the sides to create inset areas similar to what is found on our fireplace. Mr.W got us started, putting on the first piece or two with Jay. Then Jay and I did the longer pieces and then Jay left me to do the rest of the ceiling by myself. Mr.W thinks that since I come up with these great ideas, I should be the one to make them. (Read that to say: I come up with all these intricate, takes-a-lot-of-work-and-are-a-pain-to-do-but-look-really-good details so he "lets" me do them!)


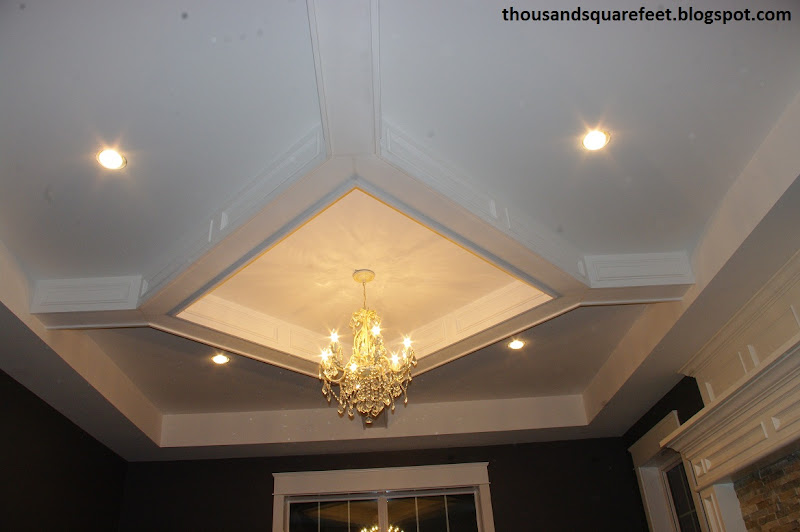
The most time-consuming and frustrating part was to follow. Panel moulding was installed in each inset area on the sides of the beams. I did about 1/2 of it on my own one evening before Mr.W (the builder/carpenter we hired to make sure we build the house right) gave me a couple of tips on how to do it even better the next day. The second half of the job looked so much tidier and tighter. After filling and painting, they practically look the same but I am much happier about the job I did on the second day.

Once all the wood work was done and all the nail holes were filled and sanded and the rest of the MDF edges sanded, the ceiling was given a good coat of paint. And, voila! The coffered ceiling I imagined since before we started building the house! It really is spectacular and worth every minute of work it took! This is our forever house, Lord willing, and we wanted to take the time to make it special. We think we accomplished just that!


 |
| This is the photo I found on Houzz and pinned |
Knowing that we would be building a coffered ceiling and not wanting to worry about finding a stud in which to attach the coffered ceiling, we covered the ceiling with OSB. This allowed us to nail wherever we wanted, knowing we would always hit wood. The OSB was then covered with drywall.
Even before the drywall began, I drew out the ceiling plan on the floor. It is much easier to measure and mark on the floor then to measure and mark on the ceiling. Then we just used a laser level later on to transfer those marks to the ceiling. Easy peasy!!
After the walls and ceiling had the drywall in place, we were sure to build bulkheads around the exterior of the living room to define the area of the coffered ceiling as well as define the living room area itself (plus hide some heating ducts). Our main floor is an open concept plan so this was a great way to separate the rooms without adding walls. Instead of using wood to create the framing for the bulkheads, we used metal angle brackets. They were simply long piece of "L" shaped aluminum. It was easy to attach them where we wanted. We needed to add small pieces of 2x4's for strength and backing for drywall but it was much easier doing it this way than using all wood. I did most, if not all, the framing of the bulkheads in the living room by myself, it was that easy.
Once that was done and the drywall was installed on the bulkheads, 2x6s were attached to the ceiling in the location of the "beams". These would create the base for the coffered ceiling detail and is the wood to which all other pieces were attached.
After the 2x6s were in place, we used cardboard to figure out the depth we wanted the beams to be.
Once that was determined, we removed the cardboard (obviously!) and went to work adding all the MDF to the sides of the 2x6s, creating the sides of the beams. Additional MDF was added to create the bottom of the beams. Then extra pieces were added on the sides to create inset areas similar to what is found on our fireplace. Mr.W got us started, putting on the first piece or two with Jay. Then Jay and I did the longer pieces and then Jay left me to do the rest of the ceiling by myself. Mr.W thinks that since I come up with these great ideas, I should be the one to make them. (Read that to say: I come up with all these intricate, takes-a-lot-of-work-and-are-a-pain-to-do-but-look-really-good details so he "lets" me do them!)
The most time-consuming and frustrating part was to follow. Panel moulding was installed in each inset area on the sides of the beams. I did about 1/2 of it on my own one evening before Mr.W (the builder/carpenter we hired to make sure we build the house right) gave me a couple of tips on how to do it even better the next day. The second half of the job looked so much tidier and tighter. After filling and painting, they practically look the same but I am much happier about the job I did on the second day.
Once all the wood work was done and all the nail holes were filled and sanded and the rest of the MDF edges sanded, the ceiling was given a good coat of paint. And, voila! The coffered ceiling I imagined since before we started building the house! It really is spectacular and worth every minute of work it took! This is our forever house, Lord willing, and we wanted to take the time to make it special. We think we accomplished just that!
There, now if I can build a coffered ceiling, you can, too! It really isn't that hard - just takes a lot of patience! What do you think? Did we accomplish what we set out to do and make a coffered ceiling just as nice as the one that inspired me?
Partying over here:
Monday, January 14, 2013
The Makings of a Traditional Fireplace - Mantle, Surround and Hearth
This is a DIY project to the max! We even built the house the fireplace is in! :)
 |
| Raising the chimney chase walls themselves, way back in June of 2012 |
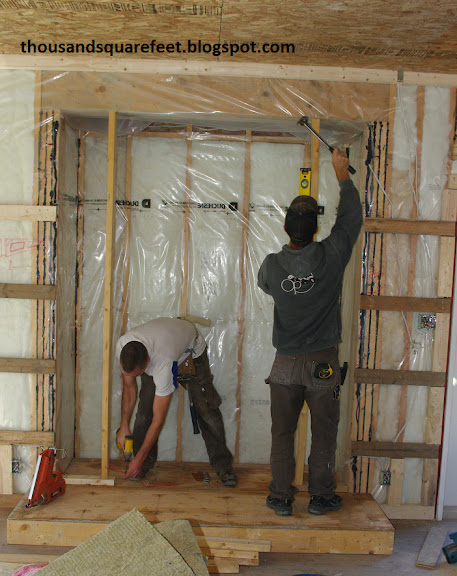 |
| Framing out the fireplace opening |
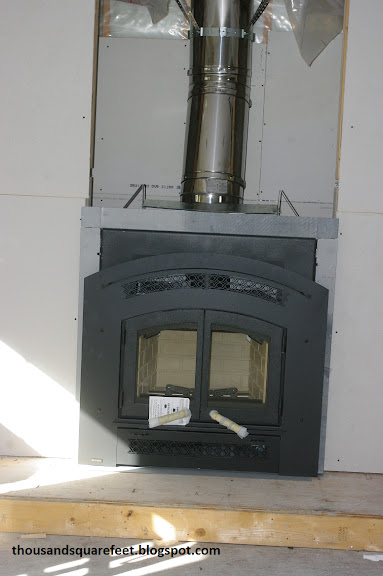 |
| Fireplace is newly installed |
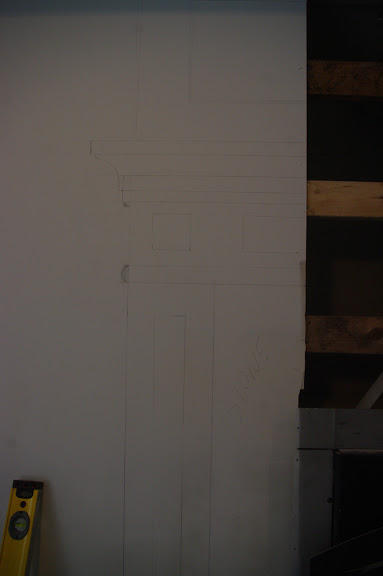
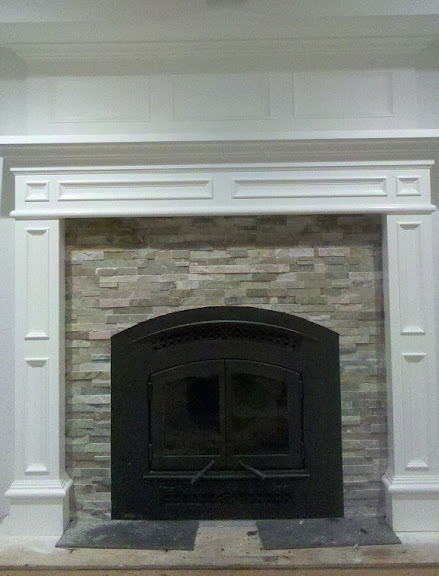
Before any work started on the actual surround, Mr.W drew out his idea on the wall. I was so excited after seeing that drawing! Not only did the drawing help us to agree on the design, it also gave Mr.W a reference point once the building of the surround began. Once that was done, Mr.W adding back framing here and there to make sure there was something to nail the MDF to when making the actual surround.

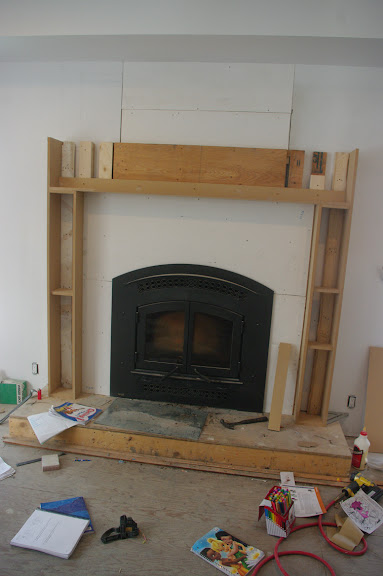
Then came time to cut the MDF. What a dusty process! He added pieces here and there and the surround started to take shape. Along the way, we talked together about how we wanted it to look, what size mouldings to use and numerous other little details that would affect the final outcome. While Mr.W did the majority of the wood work on the surround, I did add most of the panel moulding on the surround myself.


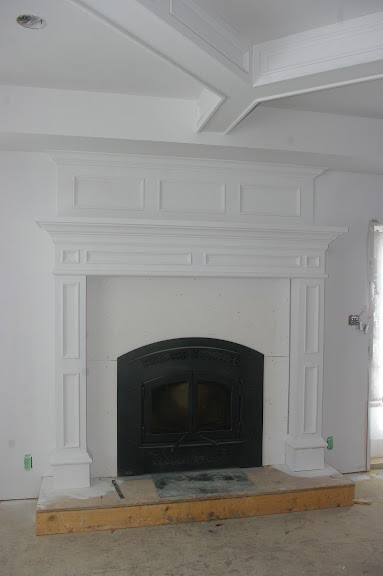
Then it was time to paint. Obviously, that was preceded by lots of sanding of the MDF and filling of all the nail holes. Then I painted a few coats of Distant Grey by Benjamin Moore, the same white we are using on all the trim in the house. I added Floetrol to the paint to increase the working time and hopefully avoid brush marks. Though it looks pretty good from a distance, I will still go over a couple areas again just to get it a little smoother. Once it was all painted, it was time to add the stone.

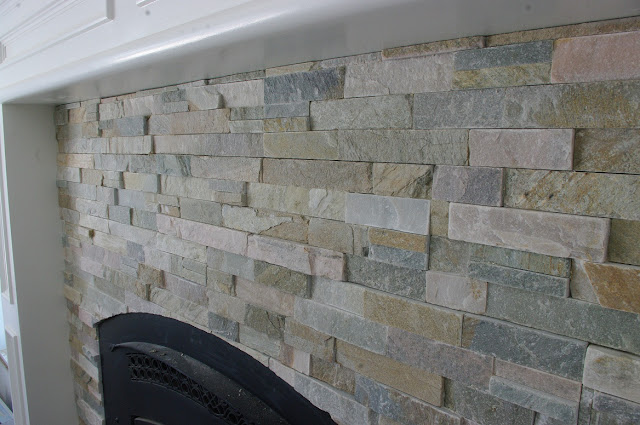
I had seen this stone months earlier at Costco and thought it could be a nice fit for the house but wasn't sure on the price. I told Jay about it and we decided to think about it a little. Once we determined it was not only a good look but a fantastic price, I went back 1-2 weeks later to get some and it was all gone! Ack! I wanted that stone. So, we decided to keep our eyes open elsewhere but nothing jumped out at me. Then, a long while later, while at Costco, they had the stone in stock again! So, we quickly did a mental calculation and popped a bunch of (very heavy) boxes in the cart. I was giddy!
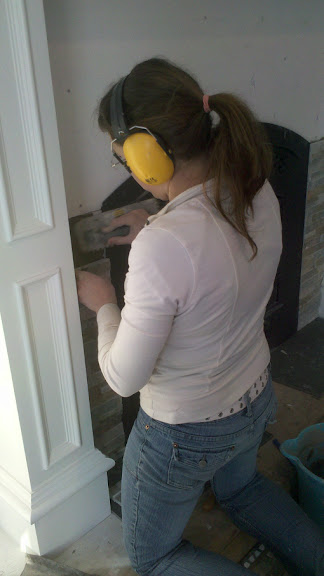
It was my job to do the stone work on the surround and I was quite okay with that. This stone comes in long rectangle strips made up of a bunch of little stone pieces glued together. Since the pieces are all different colors full of shades of greys, whites, pinks, oranges, browns and beiges, I pulled out all the pieces from the many boxes we bought and laid them out on the floor. Then I picked all my favorite pieces based on the color composition. I then arranged those pieces into the approximate shape I needed, marking which parts of the stone I would keep and which parts I didn't want. It took a little time initially but once it came time to cut the stone, it was much quicker for having figured it all out beforehand. The rest of the uncut stone I will repack and return to Costco. (They have a fantastic return policy!)

The stone cuts really well with a wet tile saw but you sure do get wet!

I started at the bottom of the surround and cut those pieces. Once both sides had their pieces cut, I mortared them in place.
Since we were attaching the stone to cement board, there was no need for lathe. We just used mortar applied to the surround and back buttered on each stone to set them in place. I did the sides up to where the fireplace starts to curve.
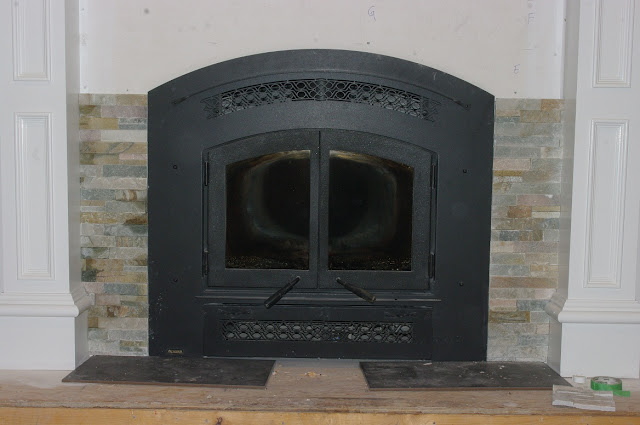
Then I went back to cutting and dry-fitting each stone in place. Whoever had the idea of a curved fireplace is a little insane! It takes so much longer to cut one curved piece of stone than many straight pieces. And if you know anything about tile saws, you cannot cut a curved shape. It takes lots of kerf cuts and some grinding with a rotary tool and lots and lots and lots of patience! BUT I did a fantastic job, if I do say so myself! I eventually had all those pieces of stone cut and mortared in place and the result is beautiful!
Then came the whole "what color tile for the hearth" debate. I was quite sure the dark grey tile was what I wanted. I saw it in stock at the local hardware store, walked by it many times each morning when I had to pick up something or other and finally thought that was the one I wanted. It looked perfect with the stone, drawing out the grey. But once I had the stone in place and finished cutting most of the tile, something looked off. I took a photo and didn't like what I saw.

I couldn't change the stone - it was mortared in place. I refused to change the flooring since it is the most perfect floor ever so it was the tile that needed to change. Thankfully Mr.W suggested I paint the walls before doing anything else. I did that and suddenly the tile worked.
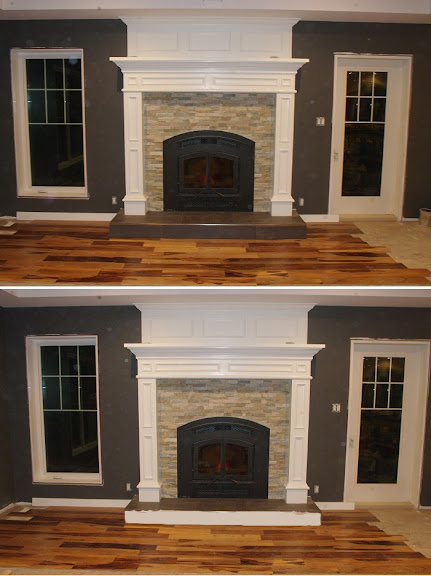
There was some suggestions to paint the front of the hearth white but after some photoshopping and some photos, it was dark all the way.
I finished cutting the last few remaining tiles and then mortared those in place, leaving 1/8" space in between for grout. The grout ended up being a little lighter than I expected but I like it anyway!
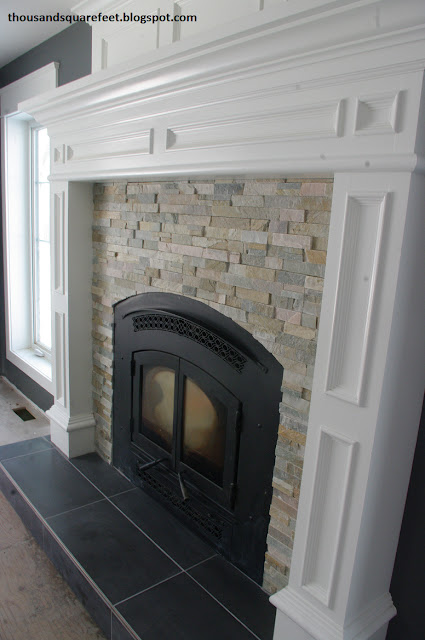
Some of you may see that the mantle is quite tall. I have a hard time reaching the mantle while standing on the floor. The fireplace required a certain amount of non-combustible material around it. That is the stone. But I really loved the look of a large and chunky mantle. Yes, I know that it will be a bit of a challenge to reach the mantle for decorating or a challenge to find stuff to put up there but I love the look and am so glad we did it this way. A smaller, shorter mantle just would not have done this room justice! And besides, even without any decor up there, it looks stunning!
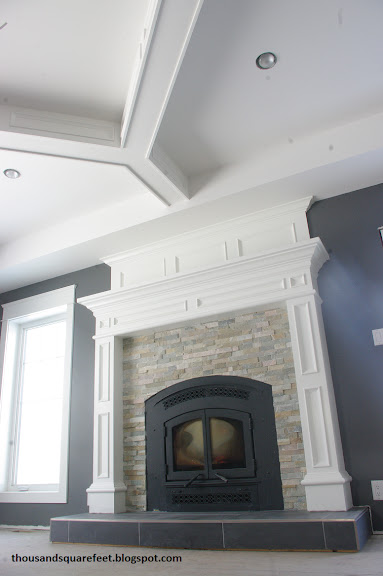
This fireplace has been the best investment ever! It throws a lot of heat and is our primary heat source while building. True, our geothermal is all hooked up but if we turn it on during construction, we void the warranty. So, until we move in, it is this fireplace and 2 small space heaters that are keeping a 2-storey house (3600 square feet) at a comfortable 60F.
I look forward to adding our new leather sectional to this room and hanging out with the whole family! We just gotta finish this room (and the rest of the house) first!
Thanks for stopping by! I would love to hear what you think of our work.
Partying over here:


Subscribe to:
Posts (Atom)


