*** This post was originally written over 1 year ago and I have finally gotten around to posting it. Please see edits below. ***
When I was researching how to make concrete counter tops, it was nearly impossible to find good information on what "recipe" to use. So, as I gathered the little bits I could find, I combined it with the information available on each product I used and came up with a recipe. However, please remember, I am NO EXPERT! I have made exactly 1 counter top (though it was a really big one - 100 square feet!.). I have yet to take the molds off the counters, grind, polish and seal the counters but, I still think there is merit in sharing what we did and then you can take it or leave it! :)
First, let me share which products we used to make our counters. Quikrete makes a Counter Top Mix product that would be so easy to use. You simply add water and you have the perfect mix for counter tops. I did look into this option but found it to be really pricey. Here in the Winnipeg, MB area, it costs $48.99 for each 80lb bag AND it is only available at a Home Hardware store a 1/2 hour drive away to a little town. Home Depot does not carry it and will not order it in. Neither will Rona. I also checked my local hardware stores and they couldn't get it either. I checked numerous stores and only the small Home Hardware in Morris could order it for me. But, at almost $50 per bag, that option was too expensive since we were going to need 35 - 80lb bags. Instead, we made our own mix.
After reading about its merits, we decided to use Quikrete 5000. It is a high-strength cement mix readily available at building supply stores. We were able to get it from our supplier for $10 for each 60lb bag. From my reading, it was suggested to add 5lbs of extra portland cement to each bag of Quikrete 5000 to increase the cement content making the final product even harder, perfect for polishing. We certainly used this advice and ordered 4 bags of grey portland cement.
In order to make a counter top-worthy mix, we also needed to add fibers for strength and a superplasticizer to decrease the amount of water used in the mix, strengthening the final product. The fibers help reduce or eliminate cracks (as does the use of wire mesh and rebar) and the superplasticizer allows us to reduce the amount of water used in the mix, allowing for a stronger and harder final product. We were able to find our fibers and superplasticizer at the local ready-mix company. They were quite willing to sell us what we needed. We used Adva 140 for the superplasticizer (13L for $100) and Fibermesh 300 for our fibers (900g bag for $12). We followed the guidelines found on the products themselves when figuring out how much to use but altered as we needed.
Finally, I wanted the perimeter counters of our kitchen to be a dark charcoal color so we used Quikrete Liquid Cement color in Charcoal. This is a super thick syrup-like colorant that you can add to your cement to color it up. You need to shake it really, really, really well in order for it to mix nicely. We were able to find the quantity we needed at the Home Depot located on the farthest end of the city, naturally (14 bottles at $11.52 per bottle)! I had wanted to use 1 1/2 bottles per batch but I was short 1 bottle so we cut it back a little to make due with what we had. It still produced a lovely charcoal color.
We also added metal lathe to all areas of the counters. When pouring the concrete into the moulds, we poured a layer, added the lathe and then poured more concrete on top to ensure the lathe stayed in the middle of the concrete. On the overhangs on both the island and peninsula and around both sink edges, we also added rebar for extra strength.
Now that you know what we used, let me share the recipe. The recipe is for one batch, which we made in a concrete mixer - we made many batches until we had all the concrete we needed.
For the charcoal perimeter counters:
3 - 60lb bags Quikrete 5000
15lbs grey portland cement
750mL Adva 140
1 bottle + 125mL Quikrete Charcoal Colorant
30g fibers (I believe we cut this back a little because it was getting a little too fiber-y)
6L water (this changed a little bit, depending on the humidity of the cement but it was pretty close to this each time)
For the lighter colored island counter where we seeded glass on top after:
3 - 60lb bags Quikrete 5000
15lbs white portland cement
750mL Adva 140
15g fibers (we cut down on the fibers due to the glass we were adding)
6L water (once again, this changed a little bit, depending on the humidity of the cement but it was pretty close)
We wanted the island counter to be a very light grey so we lightened it up by using the white portland cement instead of the grey portland for the dark perimeter counters.
When we mixed our batches, we made sure to measure each product accurately using scales and measuring cups. It is important that each batch is exactly the same as the one before it so that the entire counter looks consistent. When mixing according to our recipe, you will produce a thick, sticky concrete mix that trowels really nicely. I will be sure to update when we have polished our counters to show you the final outcome.
As for the cost breakdown, I don't have all the numbers yet but this is where it stands now:
Quikrete 5000 - 44 bags @ $10 = $440
Grey Portland cement - 4 bags @ ??
White Portland cement - 1 bag @ ??
13L Adva 140 (we only used about 11L) - $100
Fibermesh 300 - 1 bag = $12
Quikrete Charcoal Liquid Cement Color - 14 bottles @ $11.52 = $161.28
1 YEAR LATER:
I sincerely apologize for not posting this a long time ago. Time has run away from me and I have had no time to blog at all. However, I know the help this can be and so I am wanting to share it with you.
When we made the counters, I was unsure how I was going to finish them. I knew that I wanted a shiny surface that looked wet at all times. I knew that I wanted the perimeter counters to be dark grey/black in color. I wasn't sure how to get that look so we did some experimenting. I used the diamond polishing pads to polish the perimeter counters and though it made it really smooth, it wasn't shiny. Though we had added the charcoal colorant to the concrete in the perimeter counters, I still wasn't impressed with the depth of the color. It also looked blotchy, which I didn't like. We remedied that by spraying the raw concrete with a black colorant meant for concrete floors. This is the product we used in the Obsidian color. We already had it on hand because we stained other concrete floors with it. I LOVED how it evened out the color of the concrete and made the counters much darker. I finally had the color I wanted so it was time to seal it. Knowing this, we would never have added the colorant to the concrete mix itself but that is one area where we lived and learned. As for the island, the glass did not allow me to polish it with diamond pads as it would have taken forever. Initially we used a concrete grinding disk to grind the glass down smooth and then used the diamond polishing pads to get it progressively smoother. Once we had the counters smooth, it was time to seal them. After doing some experimenting with products on our test piece, we finally choose to use an epoxy-type sealant. It was purchased at Menard's and was fantastic! It is a two-part system that you mix just before you apply it. We had to ensure a dust-free environment so that was a challenge in a construction environment but we were able to do it. The epoxy was easy to use and gave me that glossy wet look that I wanted. The colors of the black counters and the glass really popped! There are a couple of places where I was unable to get the air bubbles out of the epoxy but I am okay with that. After using the counters for 1 year, I am still in love with them. Oh, sure, there are hairline scratches on the epoxy on the counters because they are used a lot but I can always recoat them with more epoxy anytime I want. I have seen absolutely no cracks in any area of the concrete counters themselves, including all the overhangs. And we use our counters a lot, even sitting on them!
To see final pictures of our kitchen and check out what the counters look like, see this blog post of our Kitchen Tour.
Showing posts with label concrete countertops. Show all posts
Showing posts with label concrete countertops. Show all posts
Tuesday, March 18, 2014
Monday, November 26, 2012
DIY Pour-in-Place Concrete Countertops
The day we had been preparing for for weeks was finally upon us - pour day! I spent hours researching, studying, researching, reading, studying, researching before this day to determine what we needed for our pour-in-place concrete counter tops. I wanted to do this correctly but not spend a fortune. Unfortunately, there was no one place to gather all the info I needed. Hopefully this post (and subsequent ones) will help others in their pour-in-place concrete counter top journey. I will not cover all the info for making the forms for the counter top - that is easier to find online, I would say. You can also look closely at our photos and learn what you can and you can ask any questions. This will be a very photo heavy post but it was a good day and I was able to capture it on "film"!
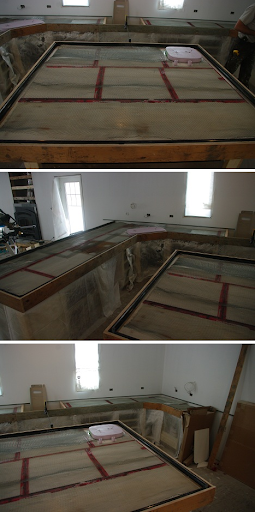


Here are the forms all ready for concrete.
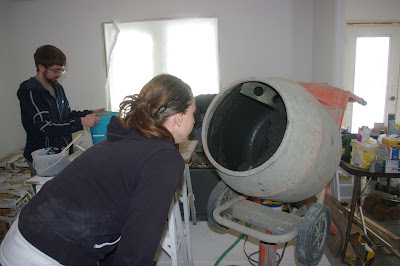
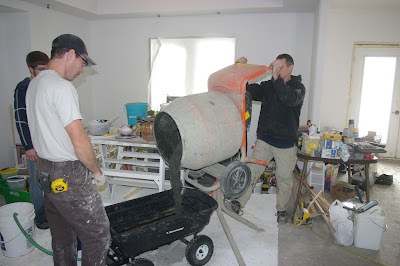
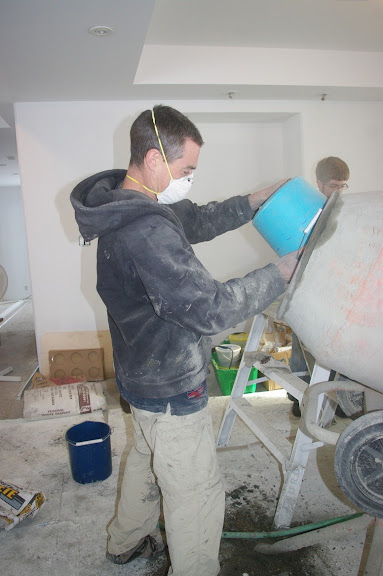
Then it was time to whip up our first batch of concrete. I PROMISE I will tell you our recipe in another post when I can finalize the price breakdown. This was the biggest stressor because NO ONE wanted to tell us how to make the concrete so it required lots of research and a little guessing. I "hope" it worked out well - we will only know when we actually take off the molds. Making the concrete required accurate measurements so we had a few scales and measuring cups in use - they worked great!
We were going for a consistency that was similar to a Wendy's frosty or thick oatmeal. I think we got it.
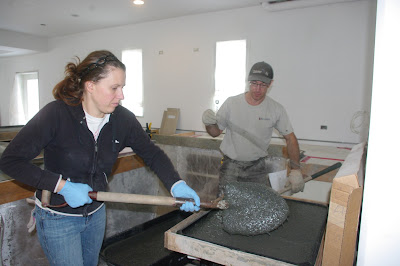
Once it was all mixed really well, it was dumped into a plastic garden cart and carted over to the counters. We did all the mixing in the dining room, right beside the kitchen where we were pouring. This is easy to do in an unfinished house!
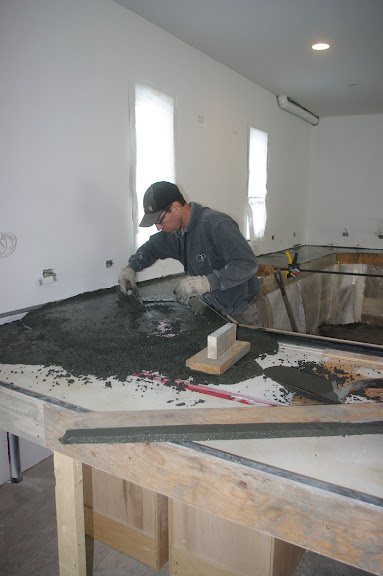
Then Mr.W and I shovelled the concrete into the counter top forms. This concrete is sticky!! It is certainly not a normal mix but we got used to it. We filled a little test piece first and then went to work on the counter tops themselves. The test piece helps us determine when to unmold and gives us a place to practicing grinding/polishing.
The counter tops will be 2" thick so we filled the forms halfway then added the expanding metal lathe we used for strength and support and finished by adding the remaining 1" of concrete on top of the lathe. Seemed to work just fine. Remember, this concrete is sticky with less water then usual so it is much more dense. We had to be sure to embed that lathe well to ensure none would be sticking up later.
Before and after adding the lathe, I vibrated the forms using a reciprocating saw without the blade. It worked really well. I vibrated until I no longer saw little bubbles coming to the surface of the concrete. I won't know how well I did until later this week but I hope I vibrated it enough!
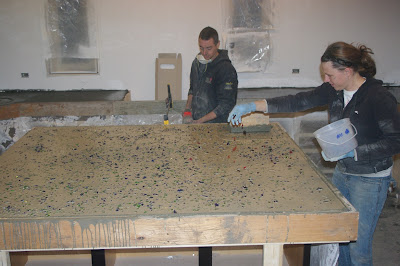
While Mr.W and I were working on the counter tops themselves, Jay and Mr.C (a guy we have hired to help us) worked on the next batch of concrete. They always rinsed out the mixer before starting a new batch. They got quite efficient at it after a while. They had to be sure to add each ingredient at the correct amount for each one. Nothing could be left out. The water was the only variable, sometimes using a little more than other times. That one was the hardest to perfect since each bag of cement had a different humidity level to it. They did such a great job.
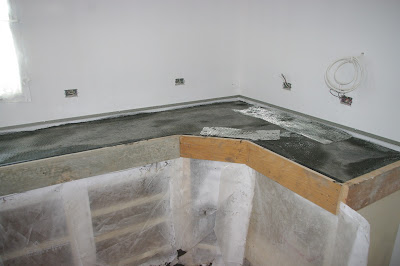
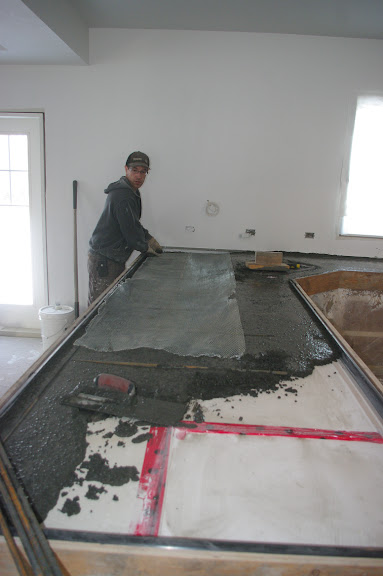
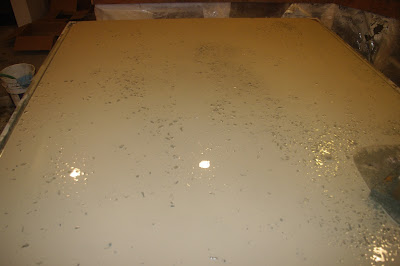
After the first counter top was poured and screed, this is what it looked like:
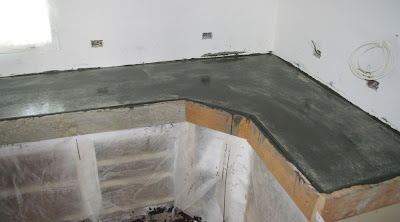
It looked a little fuzzy due to all the fibres we used in the mix sticking up. With more trowelling most disappeared but some still remained. We are convinced they will completely disappear with grinding/polishing and, if not, we can always burn them off. After a couple of hours of sitting, this is what the same counter looked like:
We continued to progress our way around the kitchen perimeter since all those counters are the same recipe, a nice dark charcoal.
Mr.W had to do a little playing around the sink opening in the perimeter counters because the sink form (Styrofoam) was about 1/4" lower than the outside of the counter top form. I am still not sure how it will turn out when dry but I am convinced it will need a bunch of grinding. Please be sure your sink form and counter top form are at the same level - it makes things infinitely easier (as is the case with our island sink - so much easier!).
Around each sink opening and for each cantilevered counter, we added in rebar as well as the expanded metal lathe.
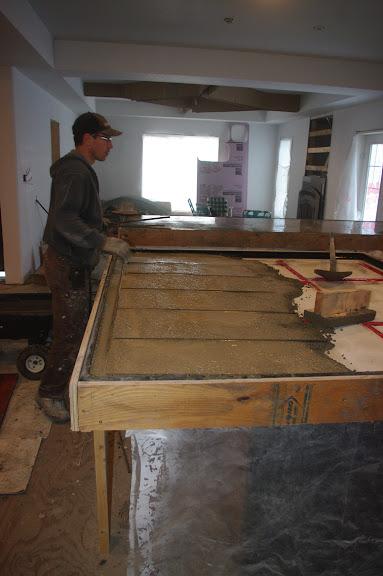
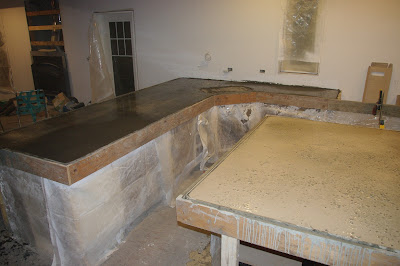
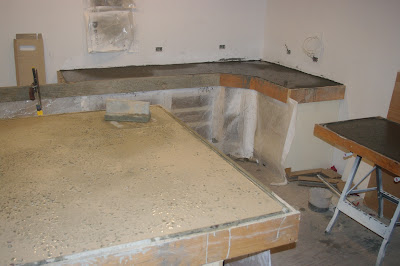
It took many batches of concrete but eventually the charcoal perimeter counters were done. Time to clean off all the tools and start on the island counter. The island is a light grey color (bordering on beige) so we needed to be sure all the tools and the mixer were nice and clean. I didn't want charcoal streaks in the light grey counters. Once again we added in rebar and metal lathe on the cantilevered section.
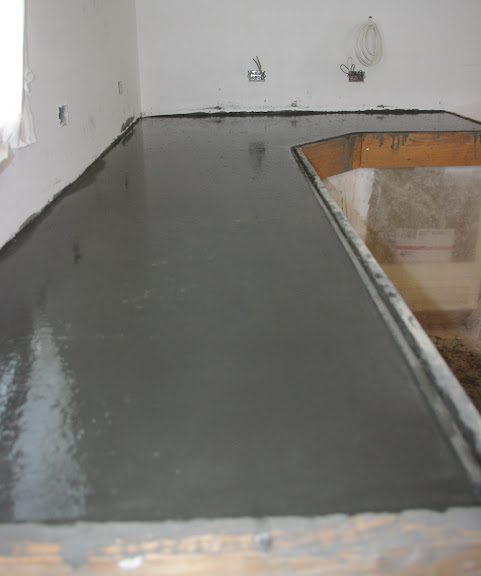
We used long pieces of wood to screed everything smooth.
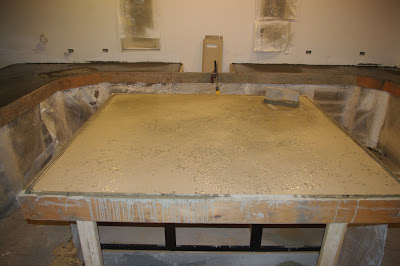
The island counter was filled with concrete and screeded smooth
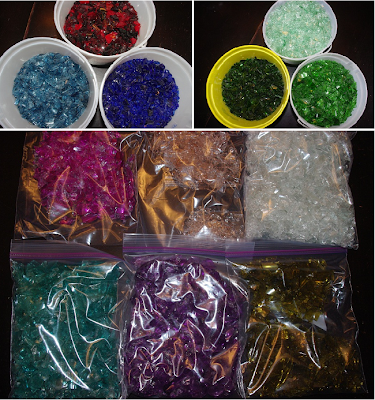
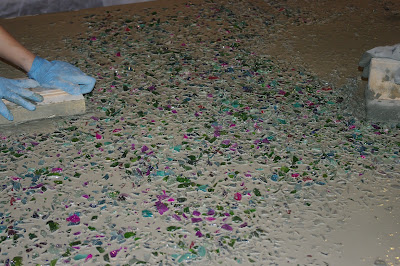
before the very fun part of seeding the glass began. While I seeded, Jay vibrated.
I used most of these colors, almost 43 pounds of glass. I did not use the clear, the very light pink or the yellow/amber.
Once the glass was seeded, we needed to embed it in the concrete. Remember, this is dense sticky concrete - the glass did not just fall into place. It required some good strong muscles to work it in. But, eventually, it was all covered by concrete. The next day both Mr.W and I had very tired arms and my wrists and hands hurt, too. It was totally worth it (well, I say that prematurely as we have not yet finished this counter. It still needs grinding/polishing but I have high hopes!).
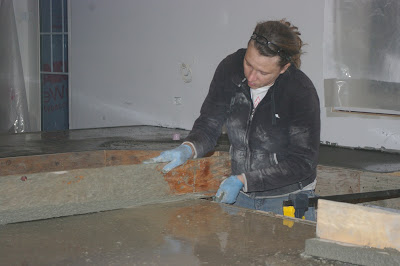
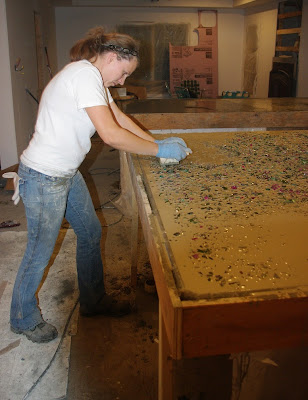
Then it was time to clean up all the equipment and start the very long process of steel trowelling the counters. Obviously with the glass on the island, it was impossible to trowel so we left it alone. The perimeter was super easy to trowel, leaving very little to no marks, thanks to the dense cement-rich concrete.
By the time 9:30pm rolled around, I was super tired. I had been at the house 12 hours already and I was so done. Everyone else had gone home a few hours earlier. I was falling asleep, I was so exhausted. The counters were drying slowly so I figured it would be okay to go home. Thankfully, Mr.W could still trowel in the morning and the rest of the imperfections will disappear with grinding/polishing. As for the island, it looks like a concrete security fence with glass shards sticking up! We will figure out what to do with it later on this week. But for now, we let them continue to cure.
Overall, the pouring of the counters was a fairly easy and enjoyable process. The prep leading up to it was stressful and I imagine the grinding/polishing will be a steep learning curve but . . . so far . . . so good!
Subscribe to:
Posts (Atom)


