Since the septic field was installed last week, the top priority was installing a toilet in the house. Jay worked on that first thing on Monday and, let me tell you, going upstairs to the bathroom instead of across the yard to an unheated building is soooo nice. We appreciate our toilet very much! :)
This week we installed floor heat pipe in the mudroom/laundry room/Jay's bathroom area to prepare for the heated concrete floor. Jay and Mr.W had marked out the lines earlier so we just needed to follow the rather faded pencils lines. Jay and I worked on laying the lines together and there was NO ARGUING!! See, miracles do happen! :) We layed out the 1/2" pipe and used talon pipe clamps for PEX pipes to nail it to the wooden subfloor. Jay held the pipe while I nailed the clamps in place.

The next day we poured the concrete floor. It was a very wet mixture so it practically flowed in place. It is only 1 1/2" thick so we made sure there was super plasticizer and fiber mesh in the mix since we weren't adding any rebar. It took many hours before it cured.


While the concrete was curing and Mr.W was babysitting it, Jay and I went to the city to pick up our new stove that was now ready. I bought this stove from the same business where I bought our full fridge/full freezer. This company specializes in scratch and dent Electrolux and Frigidaire products. This stove had a dented door so they replaced the door with a brand new one even before they let me buy it. This is a completely brand new stove but I only paid 43% of full retail value! A huge savings for what I hope is a fantastic Electrolux Dual-Fuel stove. Since we already borrowed a truck to get the stove, we "quickly" made a stop to the newest IKEA in Canada, just 30 minutes from our house. The store has only been open 1 week so it was busy but not insane. I practically had to wear blinders as I walked through because we were on a strict timeline and I needed to get to the kitchen cabinetry. We were picking up the cabinets for our laundry room and some for in the pantry. We also picked up some butcher block counters for in the laundry room. By the time we had everything we came for, the cabinets and the stove, the back of the truck was full. My next trip to IKEA better be more leisurely. But even if it isn't, IKEA is here to stay and we no longer need to travel 7 hours into another country to get to the next closest store. Jay even said we can go there as a family to eat in the restaurant ANYTIME we want. And that is a quote I will hold him to.
My focus this week has been to finish grinding/polishing the counter tops. The island is complete and ready for the sealant. The perimeter counters need a few more hours of work but they are close. However, since the saw was set up in the living room next to the kitchen and all the MDF being cut was making scads of dust, the counter tops will be finished next week. Hopefully.
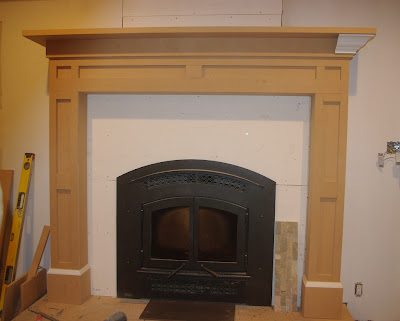
Mr.W started the actual work on the fireplace surround and mantle this week. This project he has done completely on his own with only our input for design ideas. I am okay with that. He has finished the MDF portion of the surround and next week will work on adding all the 1/2 rounds and 1/4 rounds, crown and panel moulding needed to finish it off. Then I get to paint it!


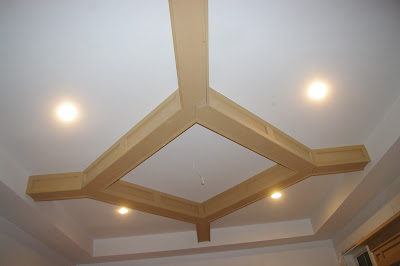
Mr.W also got Jay and I started on the coffered ceiling in the living room. He did a bit of the work with us to show us how to do it then left us to work on it alone. Once again, we were able to work together well without arguing. Maybe after almost 30 weeks of working on the house, we can finally work together like mature adults, showing the same respect to each other as we do to others? Only time will tell. We have completed all the MDF portion of the ceiling and now just need to add the panel mouldings. It is looking sooo good!
 |
| First, you add the MDF to make the sides. |
 |
| You work your way around the room adding all the sides, gluing and nailing each piece. |
 |
After you have added the sides and the bottoms, you start adding 2" stripss on the top and bottom of the sides to add more detail, which actually mimics the detail on the fireplace.
|
 |
| The bottom 2" strip overlaps the bottom of the box by 1/2" adding more dimension and interest. |
 |
| Once the 2" strips are complete, you add other pieces at the ends and in the center of each side to add further interest, mimicking the fireplace surround yet again. |
I also started painting in the office. The paint looks so good with the lights I installed last week (though Jay laments that with those pendant lights, he cannot play volleyball in the office!).

And I was also able to finish filling all the holes in the base/case in RJ's room, sand it all and caulk where needed (which was everywhere). I have never caulked before so with 2 instructions foremost in my mind - a small hole and push the gun - I am getting the hang of it. I will have many more feet to practice on. Her room is now ready for the final coat of paint on the baseboards/casings (which should be a quick thing to do) and her room is DONE! I will wait to do that final coat until I have a few more rooms ready as well.
I am so thankful for a day of rest. With all the work on the coffered ceiling, my triceps as super sore and in need of rest. And now my blog is up-to-date! :)


Oh, my goodness, everything is looking fantastic! You have excellent taste.:) Can't wait to see it!
ReplyDelete