Friday, December 21, 2012
The meds are working, Praise the Lord!!
We knew this day was coming for several weeks now but it didn't make it any easier to endure. This was the day we took all 5 kids into the children's heart center for testing. AJ needed to be retested to see if his meds were working and the rest of the kids needed to be tested to see if they also carry the same heart condition AJ does. When we arrived at just after 12:45pm, the kids all removed their coats and boots and were immediately weighed. Then the 2 little girls came with me while they had their ECG. They have never had any testing like this done so they were mighty apprehensive. Telling them they were just going to have stickers all over their tummy didn't seem to help but once Ali had her test done, Ari was quick to follow. After all, she watched Ali and saw she did fine so it was okay for her as well. While the little girls were having their ECGs, the older 3 were off with Jay for echo cardiograms (ultrasounds of their hearts). They were great for their tests. After all, all you do is lie on your side and have some goop smooshed on your chest. She rubs a wand all over your heart area and you can watch and listen to your heart - quite fascinating, really. When they were done, it was time for AJ to have his stress test. Since he has done this before, it was simple, really. Lie down, hook up all the wire, run on the treadmill, endure the speed and incline changes for 11 minutes and you are done! Well, we were thrilled to see that he was able to go for twice as long on the treadmill before his heart started showing dangerous and abnormal heart rhythms. That means his beta-blocker medication is working and we are so thankful for that! Praise Jesus! Once he was done, it was Pepe's turn. He was not so excited. Stoic. Serious. No fun. Just get it over with. He ran. He stopped at just shy of 7 minutes, complaining his legs hurt. I was a bit disappointed in him quitting but they were able to get the results they needed. Perfectly normal! Thank you, Lord! Then it was RJ's turn. She was looking forward to this for so long. She was sooo excited about running on the treadmill. So, they hooked her up and eventually, after a very long wait, she was able to hop on the treadmill. She only lasted just over 7 minutes before she asked to stop but the technician said it is hard for little kids (RJ is 6) to run coordinated on an inclined treadmill. But she did enough to get normal test results so we are super thrilled about that, too! While the older 3 were on the treadmill, the younger 2 were off for their echo cardiograms. But Ali did not like it one little bit. Jay had to lie down right behind her on the bed so the test could be done. It was but she wasn't happy about it. Ari was much better, a little more adventurous than Ali. Then, after everyone was tested, AJ was hooked up to the holter monitor, which is a portable ECG that monitors him for the next 24 hours. He has a bunch of wires stuck to him with lots of tape holding it all in place so it is rather uncomfortable but he is a trooper. I promised Lego when he is done! :) Then we sat for what seemed like forever to hear all the results. It was tiring watching one staff member after another leaving at the end of the day and we were still there. Finally, it was just our family and our doctor left. And then he told us all the good news. AJ's meds are working. Pepe and RJ have normal test results. Ari and Ali, though, because they are too young for the treadmill, will have to have a holter monitor test at some time in the future to rule out any heart condition. But their tests were also normal (which, incidentally, doesn't mean much since AJ also has normal ECG results and a normal echo cardiogram. That is why the holter and/or stress test is so important.). So, that was all good. Now on to the next steps. Jay and I must be tested. We need to go to our family doctor and explain what is happening with AJ and request testing for ourselves. AJ will fly to another province to have an MRI of his heart in the new year. This is another test the doctor is expecting to have normal results. That is the funny thing about this rare heart condition, called CPVT. Most resting results are normal. The heart muscle itself is also normal. It is just an inability of the heart's electrical system to handle adrenaline so it runs into problems with exercise or emotionally-induced stress. Once the MRI is completed, AJ will go for genetics testing to see if they can identify the gene causing the CPVT. In 40%-60% of the cases, they cannot identify the gene but they can some of the time. If they can, then we know for certain he has CPVT and the rest of the family can also be tested so we would know with certainty who has it and who doesn't. If the gene cannot be identified, a couple of other invasive tests can be performed to solidify a diagnosis of CPVT. Since those tests are not mandatory and since they are full of risks, we are inclined to not do them. It is not that important to us that we have a certain 100% diagnosis of CPVT if it means AJ's life is at risk. We know that the meds are working and we trust the doctor. He is one of only 9 specialists in the country and the only one in our province that knows and understands this relatively new and rare condition. With all the research we have done (which isn't hard to do since there is not that much written about it - remember, new and rare) we know that this is what AJ has. It fits every description to a tee. So, for now the AED stays with us until the medication controls it perfectly or until they implant an internal defibrillator. Whatever the case, we are thankful for today's results and were so glad to leave the clinic 4 1/2 long hours after we arrived.
Sunday, December 9, 2012
Owner Building a Home - Week 29 - Flooring Continues, Fireplace Surround, Coffered Ceiling
This past week has been a mixed bag of emotions for me. I made a list of all the things we need to do before we can move in the house. It is almost 200 items long and that is only the ones I remembered. Each day I have added one or two things I forgot. It is good to have a list so that I can stay focused, see what needs to be done and get it done. But it can be overwhelming to see all that is yet to be completed and it makes me think we will NEVER move in. We will but probably not this year. Maybe mid-January?
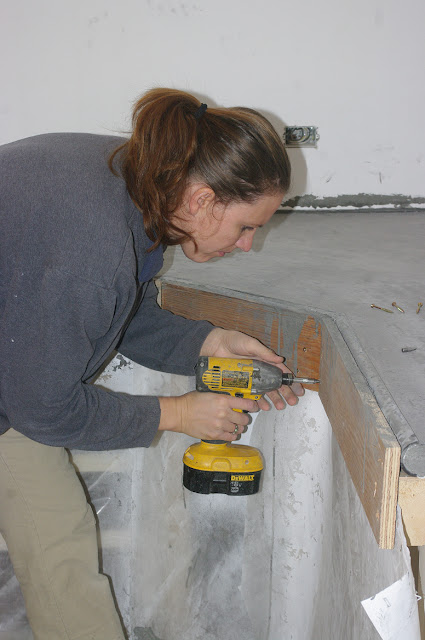
Since the septic field was installed last week, the top priority was installing a toilet in the house. Jay worked on that first thing on Monday and, let me tell you, going upstairs to the bathroom instead of across the yard to an unheated building is soooo nice. We appreciate our toilet very much! :)
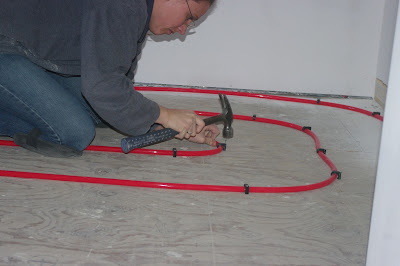
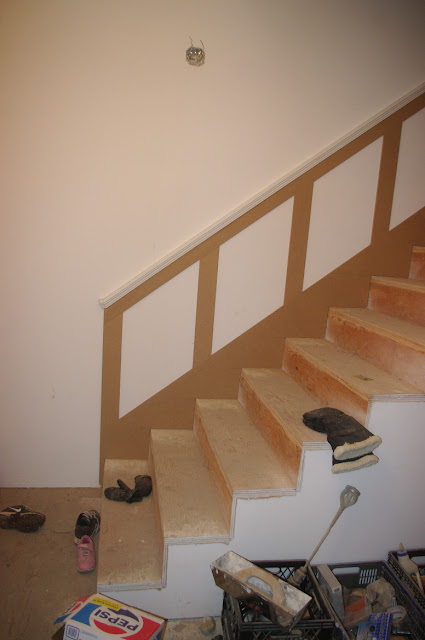
This week we installed floor heat pipe in the mudroom/laundry room/Jay's bathroom area to prepare for the heated concrete floor. Jay and Mr.W had marked out the lines earlier so we just needed to follow the rather faded pencils lines. Jay and I worked on laying the lines together and there was NO ARGUING!! See, miracles do happen! :) We layed out the 1/2" pipe and used talon pipe clamps for PEX pipes to nail it to the wooden subfloor. Jay held the pipe while I nailed the clamps in place.
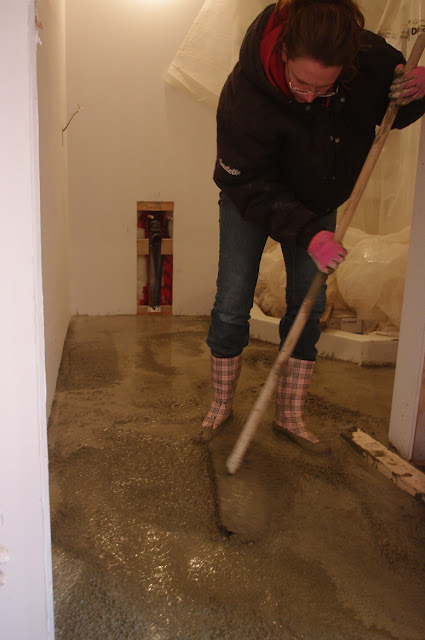
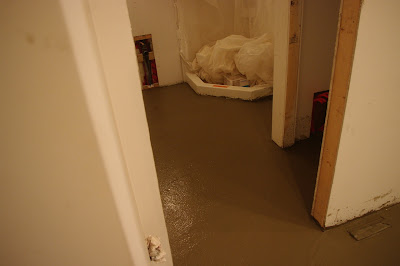
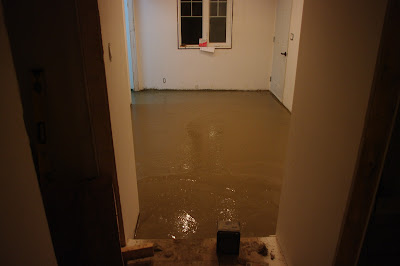
The next day we poured the concrete floor. It was a very wet mixture so it practically flowed in place. It is only 1 1/2" thick so we made sure there was super plasticizer and fiber mesh in the mix since we weren't adding any rebar. It took many hours before it cured.
While the concrete was curing and Mr.W was babysitting it, Jay and I went to the city to pick up our new stove that was now ready. I bought this stove from the same business where I bought our full fridge/full freezer. This company specializes in scratch and dent Electrolux and Frigidaire products. This stove had a dented door so they replaced the door with a brand new one even before they let me buy it. This is a completely brand new stove but I only paid 43% of full retail value! A huge savings for what I hope is a fantastic Electrolux Dual-Fuel stove. Since we already borrowed a truck to get the stove, we "quickly" made a stop to the newest IKEA in Canada, just 30 minutes from our house. The store has only been open 1 week so it was busy but not insane. I practically had to wear blinders as I walked through because we were on a strict timeline and I needed to get to the kitchen cabinetry. We were picking up the cabinets for our laundry room and some for in the pantry. We also picked up some butcher block counters for in the laundry room. By the time we had everything we came for, the cabinets and the stove, the back of the truck was full. My next trip to IKEA better be more leisurely. But even if it isn't, IKEA is here to stay and we no longer need to travel 7 hours into another country to get to the next closest store. Jay even said we can go there as a family to eat in the restaurant ANYTIME we want. And that is a quote I will hold him to.
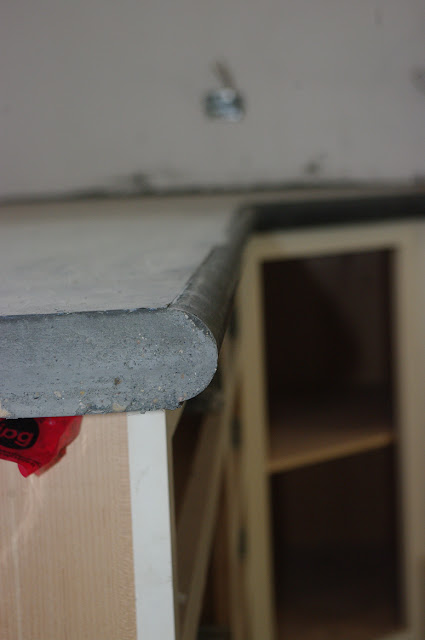
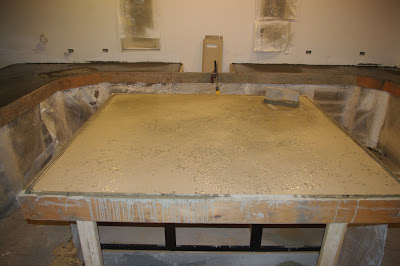
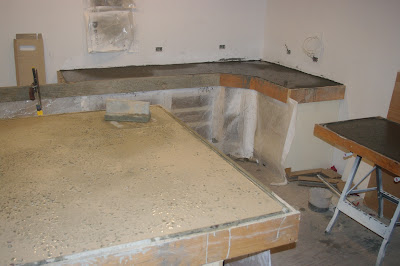
My focus this week has been to finish grinding/polishing the counter tops. The island is complete and ready for the sealant. The perimeter counters need a few more hours of work but they are close. However, since the saw was set up in the living room next to the kitchen and all the MDF being cut was making scads of dust, the counter tops will be finished next week. Hopefully.
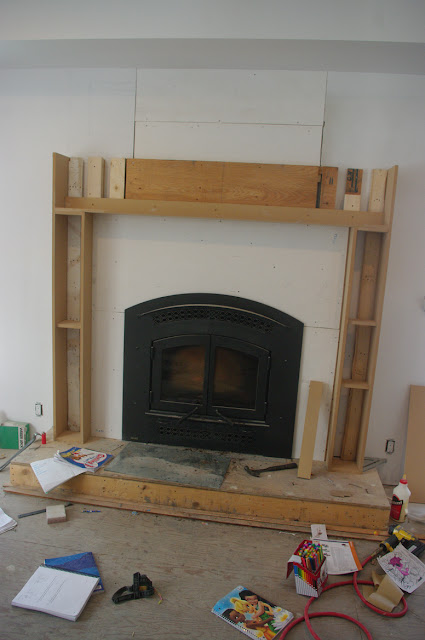
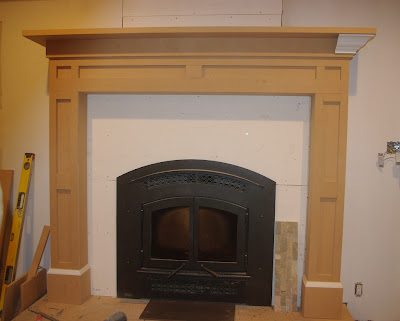
Mr.W started the actual work on the fireplace surround and mantle this week. This project he has done completely on his own with only our input for design ideas. I am okay with that. He has finished the MDF portion of the surround and next week will work on adding all the 1/2 rounds and 1/4 rounds, crown and panel moulding needed to finish it off. Then I get to paint it!


Mr.W also got Jay and I started on the coffered ceiling in the living room. He did a bit of the work with us to show us how to do it then left us to work on it alone. Once again, we were able to work together well without arguing. Maybe after almost 30 weeks of working on the house, we can finally work together like mature adults, showing the same respect to each other as we do to others? Only time will tell. We have completed all the MDF portion of the ceiling and now just need to add the panel mouldings. It is looking sooo good!

Since the septic field was installed last week, the top priority was installing a toilet in the house. Jay worked on that first thing on Monday and, let me tell you, going upstairs to the bathroom instead of across the yard to an unheated building is soooo nice. We appreciate our toilet very much! :)
This week we installed floor heat pipe in the mudroom/laundry room/Jay's bathroom area to prepare for the heated concrete floor. Jay and Mr.W had marked out the lines earlier so we just needed to follow the rather faded pencils lines. Jay and I worked on laying the lines together and there was NO ARGUING!! See, miracles do happen! :) We layed out the 1/2" pipe and used talon pipe clamps for PEX pipes to nail it to the wooden subfloor. Jay held the pipe while I nailed the clamps in place.
The next day we poured the concrete floor. It was a very wet mixture so it practically flowed in place. It is only 1 1/2" thick so we made sure there was super plasticizer and fiber mesh in the mix since we weren't adding any rebar. It took many hours before it cured.
While the concrete was curing and Mr.W was babysitting it, Jay and I went to the city to pick up our new stove that was now ready. I bought this stove from the same business where I bought our full fridge/full freezer. This company specializes in scratch and dent Electrolux and Frigidaire products. This stove had a dented door so they replaced the door with a brand new one even before they let me buy it. This is a completely brand new stove but I only paid 43% of full retail value! A huge savings for what I hope is a fantastic Electrolux Dual-Fuel stove. Since we already borrowed a truck to get the stove, we "quickly" made a stop to the newest IKEA in Canada, just 30 minutes from our house. The store has only been open 1 week so it was busy but not insane. I practically had to wear blinders as I walked through because we were on a strict timeline and I needed to get to the kitchen cabinetry. We were picking up the cabinets for our laundry room and some for in the pantry. We also picked up some butcher block counters for in the laundry room. By the time we had everything we came for, the cabinets and the stove, the back of the truck was full. My next trip to IKEA better be more leisurely. But even if it isn't, IKEA is here to stay and we no longer need to travel 7 hours into another country to get to the next closest store. Jay even said we can go there as a family to eat in the restaurant ANYTIME we want. And that is a quote I will hold him to.
My focus this week has been to finish grinding/polishing the counter tops. The island is complete and ready for the sealant. The perimeter counters need a few more hours of work but they are close. However, since the saw was set up in the living room next to the kitchen and all the MDF being cut was making scads of dust, the counter tops will be finished next week. Hopefully.
Mr.W started the actual work on the fireplace surround and mantle this week. This project he has done completely on his own with only our input for design ideas. I am okay with that. He has finished the MDF portion of the surround and next week will work on adding all the 1/2 rounds and 1/4 rounds, crown and panel moulding needed to finish it off. Then I get to paint it!
Mr.W also got Jay and I started on the coffered ceiling in the living room. He did a bit of the work with us to show us how to do it then left us to work on it alone. Once again, we were able to work together well without arguing. Maybe after almost 30 weeks of working on the house, we can finally work together like mature adults, showing the same respect to each other as we do to others? Only time will tell. We have completed all the MDF portion of the ceiling and now just need to add the panel mouldings. It is looking sooo good!
 |
| First, you add the MDF to make the sides. |
 |
| You work your way around the room adding all the sides, gluing and nailing each piece. |
 |
After you have added the sides and the bottoms, you start adding 2" stripss on the top and bottom of the sides to add more detail, which actually mimics the detail on the fireplace.
|
 |
| The bottom 2" strip overlaps the bottom of the box by 1/2" adding more dimension and interest. |
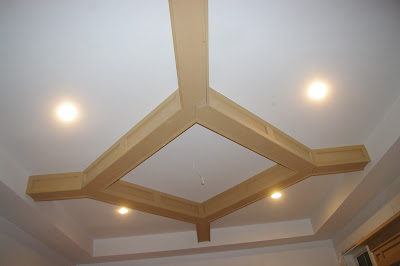 |
| Once the 2" strips are complete, you add other pieces at the ends and in the center of each side to add further interest, mimicking the fireplace surround yet again. |
I also started painting in the office. The paint looks so good with the lights I installed last week (though Jay laments that with those pendant lights, he cannot play volleyball in the office!).
And I was also able to finish filling all the holes in the base/case in RJ's room, sand it all and caulk where needed (which was everywhere). I have never caulked before so with 2 instructions foremost in my mind - a small hole and push the gun - I am getting the hang of it. I will have many more feet to practice on. Her room is now ready for the final coat of paint on the baseboards/casings (which should be a quick thing to do) and her room is DONE! I will wait to do that final coat until I have a few more rooms ready as well.
I am so thankful for a day of rest. With all the work on the coffered ceiling, my triceps as super sore and in need of rest. And now my blog is up-to-date! :)
Saturday, December 8, 2012
Owner Building a Home - Week 28 - Library Panelling, Grinding and Polishing Countertops, Septic System
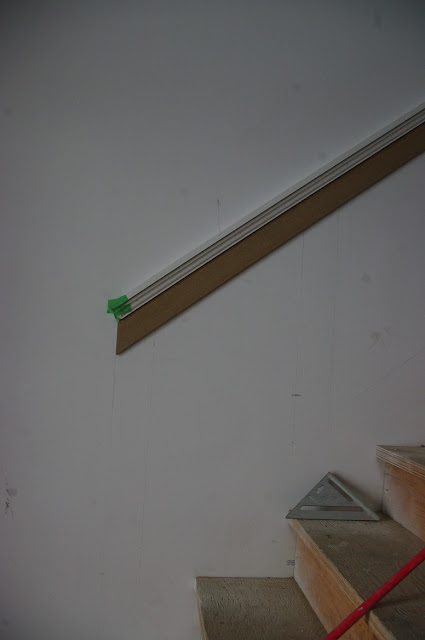
This week Mr.W started work on the library panelling we will have going up the stairway. I love the detail it adds.
Mr.W made somewhat of a comprehensive list this week to outline what still needs to be done. It is not short. Since I need to start working even more at the house, the kids are now doing their school at the new house. Yes, I still have to stop frequently to answer questions and help them out but we are sticking to the basics of math, language, spelling, and Bible for now. We will catch up on the other subjects once we have moved in.

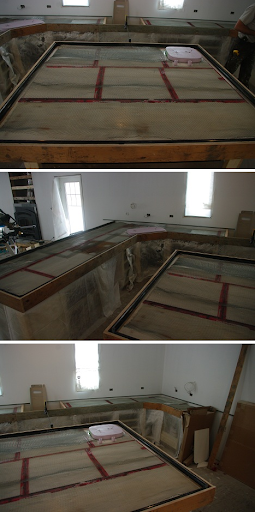
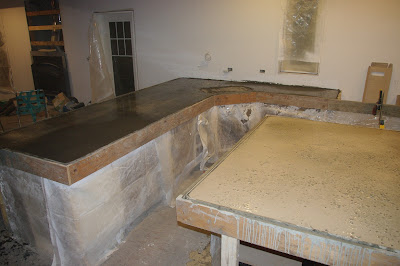
Since we poured the counters one week ago, it was time to take off the moulds. I was so excited to see how they looked. It seems we did a rather good job with the vibrating because there are not too many air pockets. Overall, I am pleased with how they looked straight out of the mould.


Mr.W made somewhat of a comprehensive list this week to outline what still needs to be done. It is not short. Since I need to start working even more at the house, the kids are now doing their school at the new house. Yes, I still have to stop frequently to answer questions and help them out but we are sticking to the basics of math, language, spelling, and Bible for now. We will catch up on the other subjects once we have moved in.
Since we poured the counters one week ago, it was time to take off the moulds. I was so excited to see how they looked. It seems we did a rather good job with the vibrating because there are not too many air pockets. Overall, I am pleased with how they looked straight out of the mould.
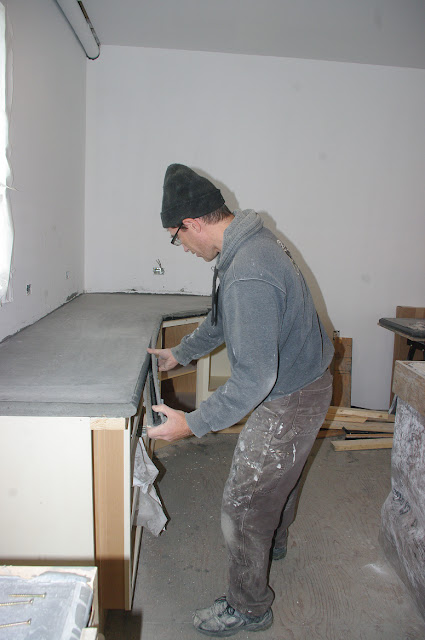
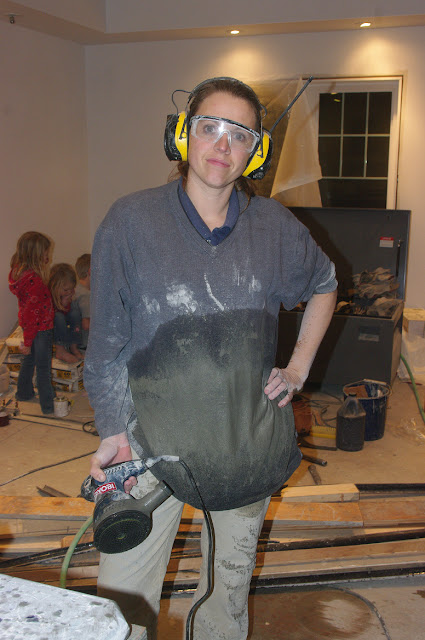
We started grinding and polishing the counters, which is what I have spent the majority of my time on this week. With the island counter top, we started grinding with a 50 grit diamond polishing pad. It worked - sort of - but would have taken forever. Plus, we would have gone through numerous pads and at $40+ each, I didn't like that option. Since we needed to grind quite a bit of it smooth since the glass was sticking up everywhere, we used a concrete grinding disc and went to work with that. Super fast! I kept the counter wet while Mr.W ground it to the level we wanted. Then I resumed grinding with the diamond polishing pads, starting with 50 grit and moving up to 100, 200 and 400. They work really well when used on a orbital sander with a wet counter. I am impressed with their performance but not impressed that the Velcro used to attach the pads to the sander wore out before the grit part did. Oh well, they work just as well if you use them by hand, just not nearly as quickly. It is wet and messy work.
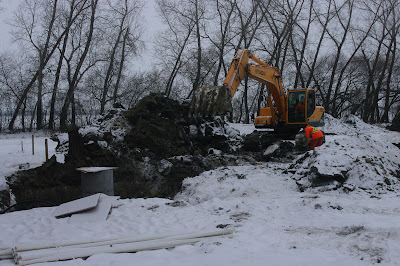
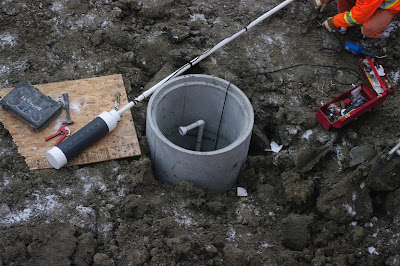
Finally, towards the end of the week, the company we hired to install the septic system arrived! It was a very happy day since we have been waiting for them for a while. They also installed a water line out into the yard that has a hydrant-style tap to turn it on and off farther under the ground. This prevents the lines from freezing so that we can not only use the line to water a garden in the summer but we can also use the line to make a skating rink in the winter. How thoughtful of my husband! While they worked on the system outside, Jay continued working on the plumbing inside and completed all we needed in order to check all the water lines for water tightness. We now have running water throughout the house! Now if only we were ready to install a faucet! With the septic system complete and the water running, a toilet is first on the agenda for next week.
And that sums up our week.
Owner Building a Home - Week 27 - Concrete Countertops
Yes, I realize this update is about 3 weeks late so I apologize. I have been busy, busy, busy! I will try to remember what we all did but I can only go according to the photos I took. Since I don't photograph everything, only some of what we did is shown here.
The big push this week was to get the last minute details completed for pouring the concrete counter tops and to pour them, which you can read all about here.
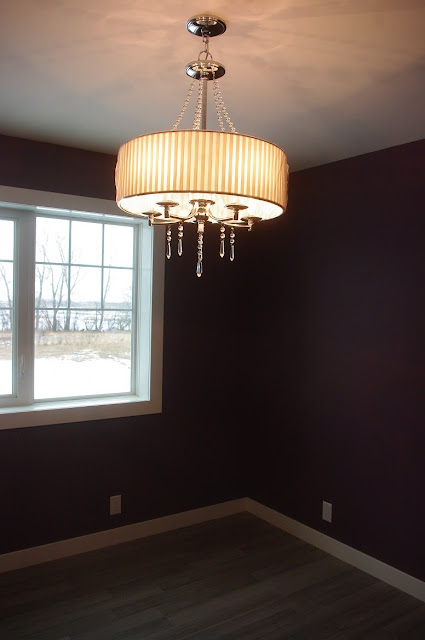
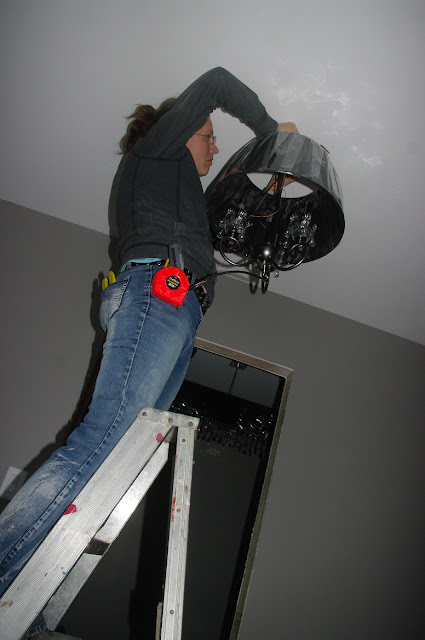
I also hung a few more lights, with some help!

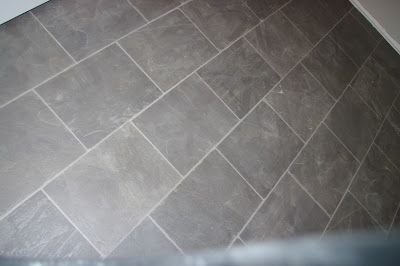
Jay installed the vinyl flooring in the kid's bathroom.
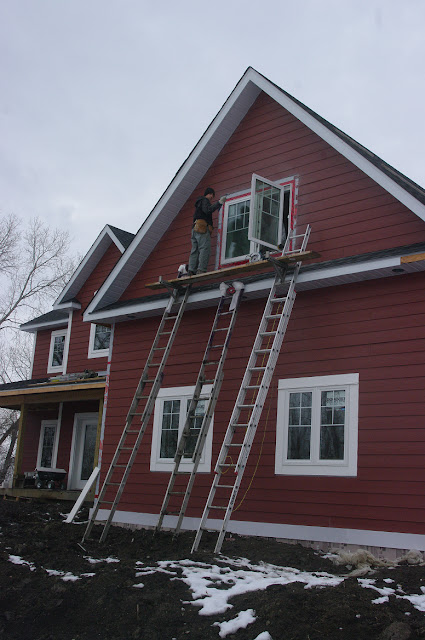
Since the temperatures were so mild, he also did some exterior work.
We also starting thinking about the fireplace surround and how we wanted it to look. Mr.W drew it on the wall to give us a better idea. It is going to look so great!

I continued with baseboards and casings throughout the upstairs but that is all I can remember doing.
Most evenings I stay at the house for supper and work into the evening. This is what it looks like (notice the pizza pop on my lap?). I look forward to spending relaxing evenings by the fireplace in something other than a lawn chair! :)

The big push this week was to get the last minute details completed for pouring the concrete counter tops and to pour them, which you can read all about here.
I also hung a few more lights, with some help!
Jay installed the vinyl flooring in the kid's bathroom.
Since the temperatures were so mild, he also did some exterior work.
We also starting thinking about the fireplace surround and how we wanted it to look. Mr.W drew it on the wall to give us a better idea. It is going to look so great!
I continued with baseboards and casings throughout the upstairs but that is all I can remember doing.
Most evenings I stay at the house for supper and work into the evening. This is what it looks like (notice the pizza pop on my lap?). I look forward to spending relaxing evenings by the fireplace in something other than a lawn chair! :)
Monday, November 26, 2012
DIY Pour-in-Place Concrete Countertops
The day we had been preparing for for weeks was finally upon us - pour day! I spent hours researching, studying, researching, reading, studying, researching before this day to determine what we needed for our pour-in-place concrete counter tops. I wanted to do this correctly but not spend a fortune. Unfortunately, there was no one place to gather all the info I needed. Hopefully this post (and subsequent ones) will help others in their pour-in-place concrete counter top journey. I will not cover all the info for making the forms for the counter top - that is easier to find online, I would say. You can also look closely at our photos and learn what you can and you can ask any questions. This will be a very photo heavy post but it was a good day and I was able to capture it on "film"!


Here are the forms all ready for concrete.
Then it was time to whip up our first batch of concrete. I PROMISE I will tell you our recipe in another post when I can finalize the price breakdown. This was the biggest stressor because NO ONE wanted to tell us how to make the concrete so it required lots of research and a little guessing. I "hope" it worked out well - we will only know when we actually take off the molds. Making the concrete required accurate measurements so we had a few scales and measuring cups in use - they worked great!
We were going for a consistency that was similar to a Wendy's frosty or thick oatmeal. I think we got it.
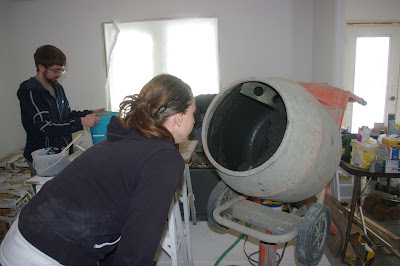
Once it was all mixed really well, it was dumped into a plastic garden cart and carted over to the counters. We did all the mixing in the dining room, right beside the kitchen where we were pouring. This is easy to do in an unfinished house!
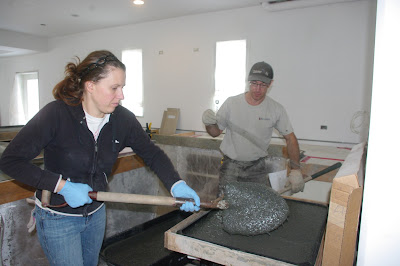
Then Mr.W and I shovelled the concrete into the counter top forms. This concrete is sticky!! It is certainly not a normal mix but we got used to it. We filled a little test piece first and then went to work on the counter tops themselves. The test piece helps us determine when to unmold and gives us a place to practicing grinding/polishing.
The counter tops will be 2" thick so we filled the forms halfway then added the expanding metal lathe we used for strength and support and finished by adding the remaining 1" of concrete on top of the lathe. Seemed to work just fine. Remember, this concrete is sticky with less water then usual so it is much more dense. We had to be sure to embed that lathe well to ensure none would be sticking up later.
Before and after adding the lathe, I vibrated the forms using a reciprocating saw without the blade. It worked really well. I vibrated until I no longer saw little bubbles coming to the surface of the concrete. I won't know how well I did until later this week but I hope I vibrated it enough!
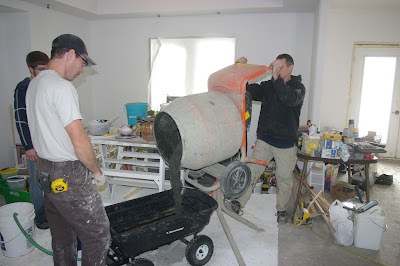
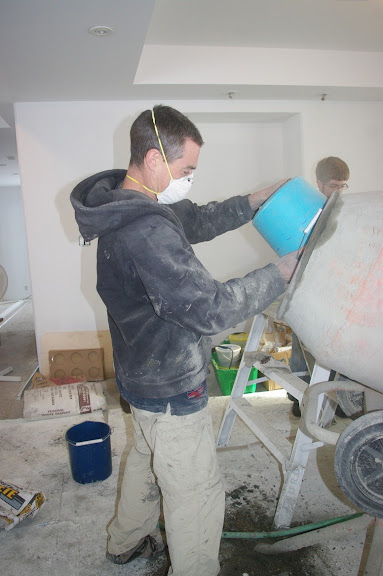
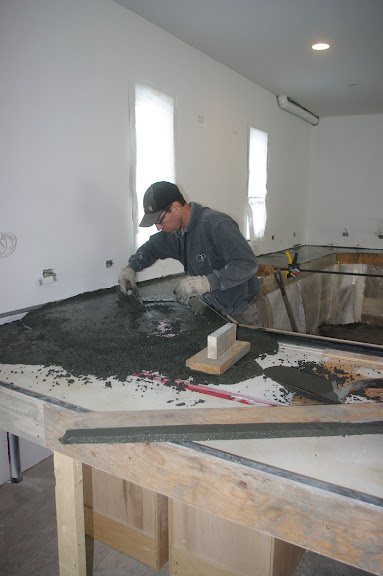
While Mr.W and I were working on the counter tops themselves, Jay and Mr.C (a guy we have hired to help us) worked on the next batch of concrete. They always rinsed out the mixer before starting a new batch. They got quite efficient at it after a while. They had to be sure to add each ingredient at the correct amount for each one. Nothing could be left out. The water was the only variable, sometimes using a little more than other times. That one was the hardest to perfect since each bag of cement had a different humidity level to it. They did such a great job.
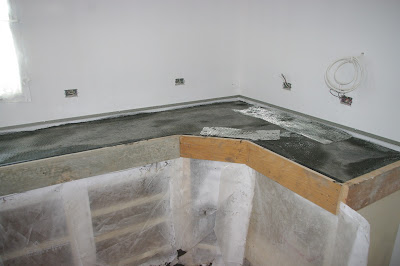
After the first counter top was poured and screed, this is what it looked like:
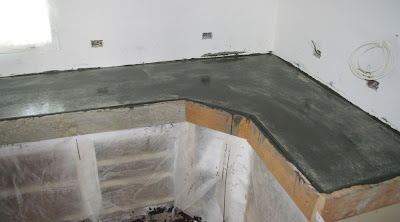
It looked a little fuzzy due to all the fibres we used in the mix sticking up. With more trowelling most disappeared but some still remained. We are convinced they will completely disappear with grinding/polishing and, if not, we can always burn them off. After a couple of hours of sitting, this is what the same counter looked like:
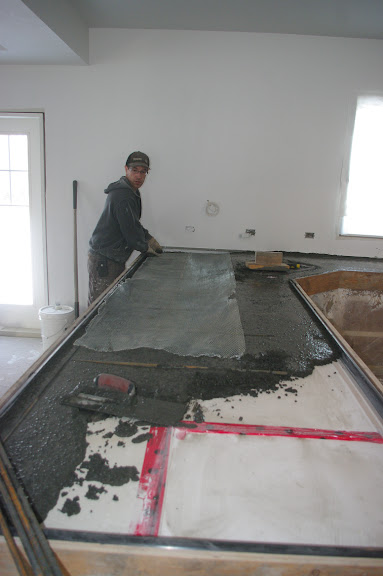
We continued to progress our way around the kitchen perimeter since all those counters are the same recipe, a nice dark charcoal.
Mr.W had to do a little playing around the sink opening in the perimeter counters because the sink form (Styrofoam) was about 1/4" lower than the outside of the counter top form. I am still not sure how it will turn out when dry but I am convinced it will need a bunch of grinding. Please be sure your sink form and counter top form are at the same level - it makes things infinitely easier (as is the case with our island sink - so much easier!).
Around each sink opening and for each cantilevered counter, we added in rebar as well as the expanded metal lathe.
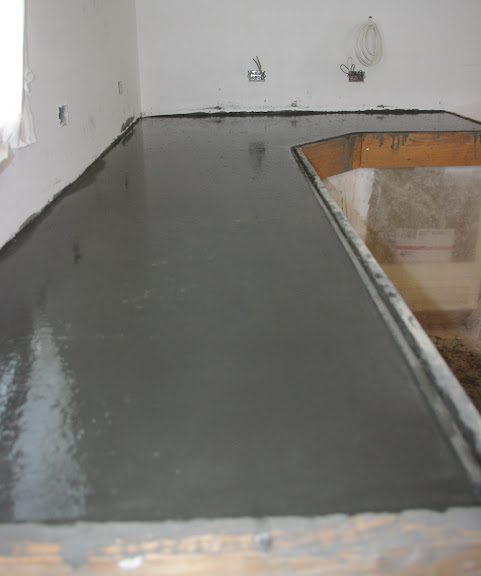
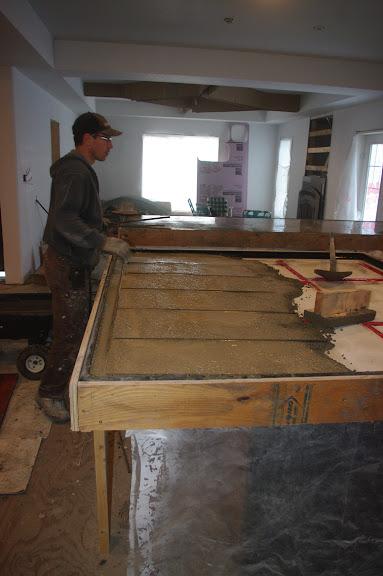
It took many batches of concrete but eventually the charcoal perimeter counters were done. Time to clean off all the tools and start on the island counter. The island is a light grey color (bordering on beige) so we needed to be sure all the tools and the mixer were nice and clean. I didn't want charcoal streaks in the light grey counters. Once again we added in rebar and metal lathe on the cantilevered section.
We used long pieces of wood to screed everything smooth.
The island counter was filled with concrete and screeded smooth
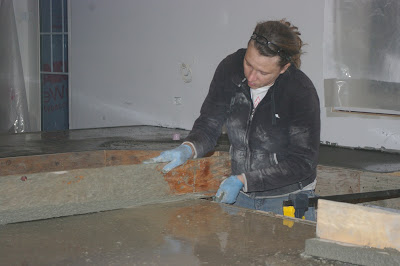
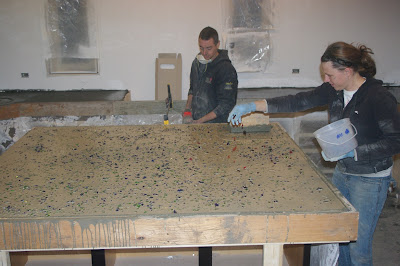
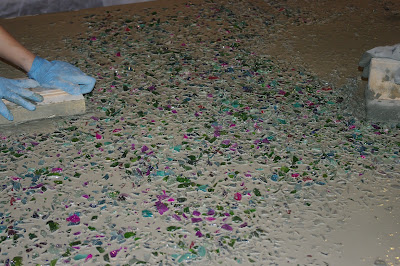
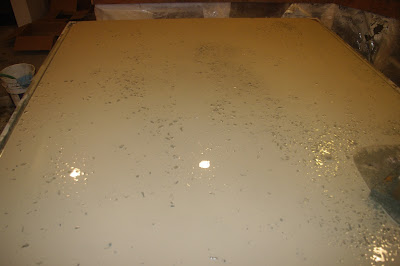
before the very fun part of seeding the glass began. While I seeded, Jay vibrated.
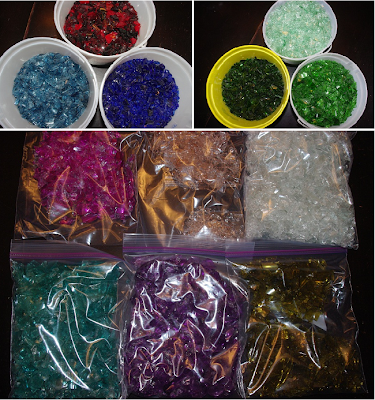
I used most of these colors, almost 43 pounds of glass. I did not use the clear, the very light pink or the yellow/amber.
Once the glass was seeded, we needed to embed it in the concrete. Remember, this is dense sticky concrete - the glass did not just fall into place. It required some good strong muscles to work it in. But, eventually, it was all covered by concrete. The next day both Mr.W and I had very tired arms and my wrists and hands hurt, too. It was totally worth it (well, I say that prematurely as we have not yet finished this counter. It still needs grinding/polishing but I have high hopes!).
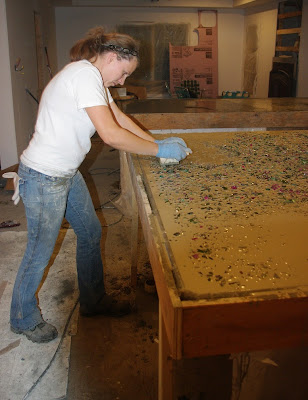
Then it was time to clean up all the equipment and start the very long process of steel trowelling the counters. Obviously with the glass on the island, it was impossible to trowel so we left it alone. The perimeter was super easy to trowel, leaving very little to no marks, thanks to the dense cement-rich concrete.
By the time 9:30pm rolled around, I was super tired. I had been at the house 12 hours already and I was so done. Everyone else had gone home a few hours earlier. I was falling asleep, I was so exhausted. The counters were drying slowly so I figured it would be okay to go home. Thankfully, Mr.W could still trowel in the morning and the rest of the imperfections will disappear with grinding/polishing. As for the island, it looks like a concrete security fence with glass shards sticking up! We will figure out what to do with it later on this week. But for now, we let them continue to cure.
Overall, the pouring of the counters was a fairly easy and enjoyable process. The prep leading up to it was stressful and I imagine the grinding/polishing will be a steep learning curve but . . . so far . . . so good!
Subscribe to:
Posts (Atom)


