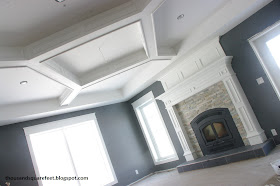
| This is the photo I found on Houzz and pinned |
Knowing that we would be building a coffered ceiling and not wanting to worry about finding a stud in which to attach the coffered ceiling, we covered the ceiling with OSB. This allowed us to nail wherever we wanted, knowing we would always hit wood. The OSB was then covered with drywall.
Even before the drywall began, I drew out the ceiling plan on the floor. It is much easier to measure and mark on the floor then to measure and mark on the ceiling. Then we just used a laser level later on to transfer those marks to the ceiling. Easy peasy!!

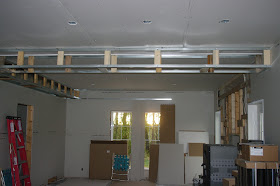
After the walls and ceiling had the drywall in place, we were sure to build bulkheads around the exterior of the living room to define the area of the coffered ceiling as well as define the living room area itself (plus hide some heating ducts). Our main floor is an open concept plan so this was a great way to separate the rooms without adding walls. Instead of using wood to create the framing for the bulkheads, we used metal angle brackets. They were simply long piece of "L" shaped aluminum. It was easy to attach them where we wanted. We needed to add small pieces of 2x4's for strength and backing for drywall but it was much easier doing it this way than using all wood. I did most, if not all, the framing of the bulkheads in the living room by myself, it was that easy.

Once that was done and the drywall was installed on the bulkheads, 2x6s were attached to the ceiling in the location of the "beams". These would create the base for the coffered ceiling detail and is the wood to which all other pieces were attached.
After the 2x6s were in place, we used cardboard to figure out the depth we wanted the beams to be.

Once that was determined, we removed the cardboard (obviously!) and went to work adding all the MDF to the sides of the 2x6s, creating the sides of the beams. Additional MDF was added to create the bottom of the beams. Then extra pieces were added on the sides to create inset areas similar to what is found on our fireplace. Mr.W got us started, putting on the first piece or two with Jay. Then Jay and I did the longer pieces and then Jay left me to do the rest of the ceiling by myself. Mr.W thinks that since I come up with these great ideas, I should be the one to make them. (Read that to say: I come up with all these intricate, takes-a-lot-of-work-and-are-a-pain-to-do-but-look-really-good details so he "lets" me do them!)


The most time-consuming and frustrating part was to follow. Panel moulding was installed in each inset area on the sides of the beams. I did about 1/2 of it on my own one evening before Mr.W (the builder/carpenter we hired to make sure we build the house right) gave me a couple of tips on how to do it even better the next day. The second half of the job looked so much tidier and tighter. After filling and painting, they practically look the same but I am much happier about the job I did on the second day.

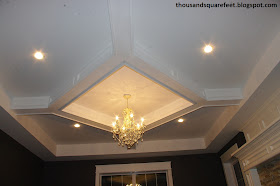
Once all the wood work was done and all the nail holes were filled and sanded and the rest of the MDF edges sanded, the ceiling was given a good coat of paint. And, voila! The coffered ceiling I imagined since before we started building the house! It really is spectacular and worth every minute of work it took! This is our forever house, Lord willing, and we wanted to take the time to make it special. We think we accomplished just that!


There, now if I can build a coffered ceiling, you can, too! It really isn't that hard - just takes a lot of patience! What do you think? Did we accomplish what we set out to do and make a coffered ceiling just as nice as the one that inspired me?
Partying over here:
Wow!!!! Love your ceiling and chandy - so stunning! You and your hubs are so talented! Thanks for linking up to It's Party Time! :D
ReplyDeleteThanks, Heather! I wouldn't say we are that talented. We had good direction and a whole lot of determination! Sorry it took so long for this comment to appear - it ended up in spam for some reason.
DeleteSimply STUNNING!!! I love the sparkle!! Each of my kids saw it as I sat at the computer - they were wowed too :). Excellent job!!
ReplyDeleteI agonized over the light choice for some time, even photoshopping different lights into a photo to see what I wanted. Finally I just picked up a really traditional-looking chandelier with about a million crystals and went with that. It is perfect! And super sparkly!
ReplyDeleteThat is amazing! Not only do you have a magazine-worthy living room; you can "jaw-drop" all your friends when you say "yea, I did that"!! So great!
ReplyDeleteThat's amazing!! Not only do you have a magazine-worthy living room now, you can watch your guests jaws drop when you say "yea, I did it myself"! Looks perfect!
ReplyDeleteI also wanted to add - being able to include elements like this is yet another benefit of being able to take your time with the plans. It is evident that you guys didn't rush into this, and consequently things are thought through carefully and with a lot of added personal details.
ReplyDeleteWOW! You make it look so easy. I love what you have done so far-- nice job!
ReplyDeleteReally great job. I see people doing this two ways. Installing a 2x6 or other sized board to the ceiling as you did. Then building the sides and molding from there or using blocks to lay everything out. Seems like adding a whole board would be easier for the DIYer.
ReplyDelete